Thursday, June 30, 2011

Feeling a little blue


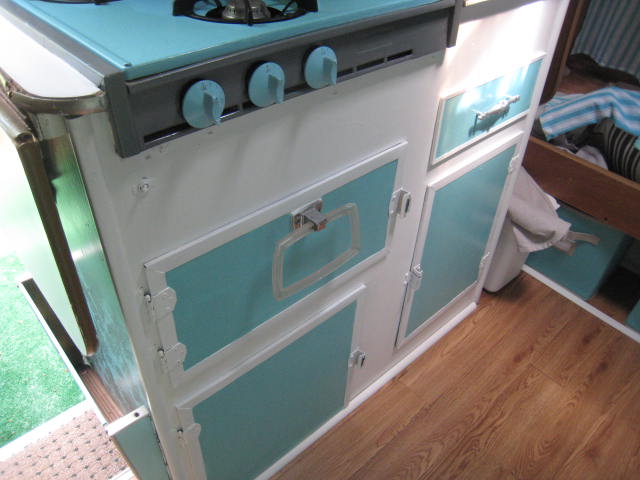
A quick glimpse at my renovation receipts and, shock of all shock, the most money I spent was on SPRAY PAINT from walmart that I (bless my heart) thought looked close enough to the Scotty Aqua/Turquoise (I think it was a tad too blue). I've read on one of the two Scotty sites that some believe the 1979 HiLander switched to a Brown trim and moved away from the Aqua. This is NOT the case with Louis, as after I peeled off the Pizza Hut red I revealed the original color underneath with the yellow at the front. While normally I would take that sample in to Lowe's or Ace and have them scan it to match the color, I noticed on the SSCE site the color formula for the Aqua. The only difference when I went to Lowe's was they no longer sell oil based paint for environmental reasons. The previous owner brushed the red and silver colors on and I don't feel like sanding the entire trailer, so will do the same. I, however, like to splurge on a nice brush so purchased a Purdy brush. I bought exterior and interior high gloss and went to town! Yes, some might say I went a bit too far, but had a blast matching my new cooler with the old Scotty colors. To jazz up my cabinet doors a bit I added the color to the center panels. I love it and am so happy to have the matching formula!
WHAT I DID: Purchased a quart of exterior and one quart of interior HIGH GLOSS VALSPAR paint in this formula: Base 1, 101-5.5, 102-6.5, 103-31

Sunday, June 26, 2011

Naughty Potty


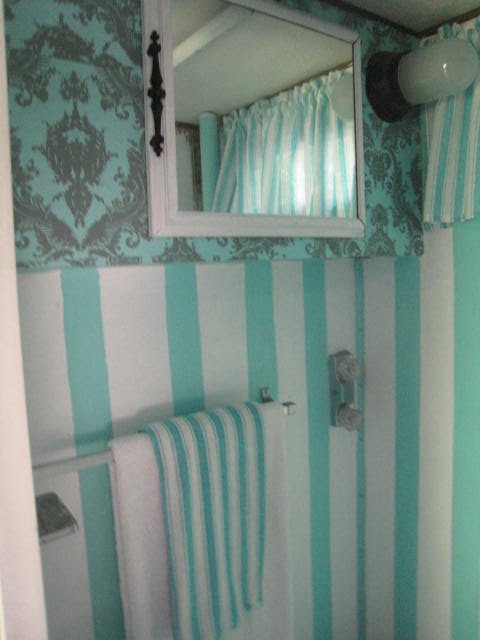
Finally the rain stopped, humidity stayed away for at least a day and I had enough time to drag a fan out to Louis and let the paint dry. So, here's what I've done to make this Scotty Potty a little more interesting. As I've said, this part of my redesign was the last on my list, because I just didn't think I would use this as a bathroom at all..UNTIL my maiden voyage. I don't like brushing my teeth in a public restroom (call me a snob) and having a late night place to release without walking through the dark woods was yet another added bonus. Plus, if and when I ever sell Louis, I'm sure the added feature of a wet bath will come in handy. After I figured the toilet situation out (where it leads to, how to clean and dump it, etc.) I felt much better. With my initial plan in mind (to spend as little as possible) I used paint I'd already had for other projects, adding my own little flare so now people won't mind going in there!
HERE'S WHAT I DID: The main interior of Louis is wallpapered with my great find from Amazon, cabinets are white and the dinette is painted turquoise/Aqua. I used three distinct colors/textures (wallpaper, white and Aqua) to make three distinct areas, giving the illusion of a bigger space. The Potty room marries all of these looks in one, funky, yet cohesive way. On the vanity I placed the same wallpaper as in the main areas. I removed the door, painted it white and updated the handle by painting it a mat black. Because removing the original wallpaper would be a pain in the neck and most likely result in more damage to the walls, I simply primed them with ZPrimer and added two coats of Semi Gloss bright white paint. For the floor I added a dark grey porch and floor paint. For that fun flare, I took the same aqua from the main area (mixed with both primer and paint at Ace Hardware) and painted stripes. Because I wanted these to trick the eye a bit (is it wallpaper or hand painted?) I did these freehand, without painters tape, no measuring distance between, etc. I love the somewhat artsy look of it (I drew lines on the wall with a pencil, made sure I didn't have too much coffee before I started to paint, and slowly followed the lines). For added protection on the floor (just in case it's ever used as a shower again) I added a coat of poly protectant. The only money I spent on this redo was $5.99 for the furry seat cover at Kmart (couldn't resist) and the valance curtain I pulled from a set I purchased at the Christmas Tree Store for $5.99 (set came with valance and two 36" curtains I will use in the main part of the trailer. Because we have 5,000 shower mats, I took one and cut it to size for the top of the toilet box. The interesting thing I noticed last night as we sipped martinis, you can actually create extra seating by having someone sit on the pot! Hummm
HOW LONG THIS TOOK AND HOW MUCH: Again, it was under $15 for my accessories and took two hours but almost a week to dry with the humidity and rain!

Thursday, June 23, 2011

Aqua light special


I don't usually shop at Kmart. In fact, I thought they were out of business until I was leaving the Lowe's/Christmas Tree Store parking lot yesterday and noticed a big, red "K" out of the corner of my eye. Because I'm always on the hunt for anything AQUA, I figured I'd pop in. Little did I know I'd return home an hour later to find a totally soaked Louis (scroll down two posts if you haven't seen what I'm facing today as my first project), so I was in bliss when I found these great items on sale. The chairs were a great steal, I think, at $14.99/each and the metal folding table was $34.99 and also came with a choice of metal folding chairs for $19.99/each (seems like they'd be a bit warm in the sun. What I was really on the hunt for and FINALLY found for under $5 was the final touch I was looking for in my Scotty Potty. Again, sorry for the delay in revealing the final photos, but I've got to get working on my new water damage before pushing ahead with the final touches on the potty room. At any rate, at the end of the day, in spite of everything frustrating that happened, at least I know there is a blue light special at the end of the tunnel!

Wednesday, June 22, 2011

I love a rainy day


I was born in Seattle so, naturally, I love a rainy day. Today where I live on the opposite coast it is raining cats and angry dogs, so I've decided to head out to pick up a few extra things for Louis since it doesn't look like I'll be able to finish my painting project in the bathroom any time soon. So, I jumped in the sleigh and headed to the north pole. Actually, I jumped in my Land Cruiser and headed north to Poughkeepsie, New York to the Christmas Tree store where I found these great curtains for Louis for $5.99!!! The valance fits the front and rear windows perfectly, and each set comes with a valance and two 36" curtains. I love, love, love them and it saved me from sewing!!!
HERE'S WHAT I DID: Stopped into the Christmas Tree Store and found this great set of curtains (two panels and a valance) for $5.99/set. Initially I had gone to Michael's arts and crafts store and purchased sewing tape (easily applied to back of fabric and either ironed on or double stick taped to create seam), but this is a much easier solution. And, because they're so inexpensive I can still make my Michael's version and, just like in my home, change out the look periodically to keep it fresh and interesting!
WHAT IT COST ME: $5.99 for a set, I bought THREE so I could put two valances on the front cafe window. You'll also notice the striped tablecloth I bought for $2.99. My idea? Place a piece of rope or window rubber (similar to what I used on the screen project) and roll it under one side, similar to piping on a chair or sofa. Then I will place that end in my awning strip on the trailer. Maybe it works, maybe it doesn't, we'll see. In the end, it's only $2.99 so if it won't work as a cheap awning, I'll recover a few outdoor chairs and use them when I'm camped at home!

And then there are times I can't stand the rain!!!


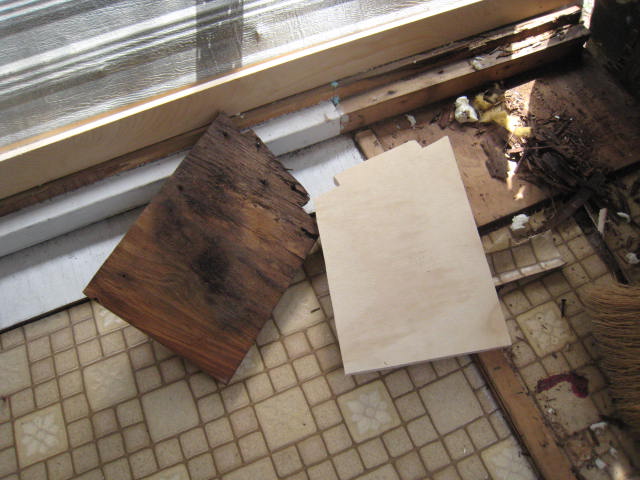
I remember buying an expensive leather chair at Restoration Hardware one year. I was so excited, yet stressed because I splurged on the purchase, but figured I'd worked hard enough and deserved it. Joe and I went out to celebrate with dinner that night and returned to find the $3,500 chair I'd just purchased chewed into a thousand pieces by our dogs, Bones and Canyon. In that moment I wanted to scream, cry and vomit all at once but instead I told myself, "I won't let this defeat me" and I didn't. We realized we had accidentally locked our doggy door (both Bones...passed away last year...and Canyon are rescue dogs and HATE being locked indoors) so, in an attempt to get out and TELL US HOW ANGRY THEY WERE TO BE LOCKED INSIDE, they destroyed the chair. Today, when I popped back into Louis midday to see if the bathroom was finished I smelled something musty and awful. I looked towards the back and this is what I found....again, my fault. I haven't replaced the rear window yet, only put a plexiglass quick fix up, so what did I expect? The other corner, however, I have no idea why is leaking. So, instead of pushing Louis off a ledge into the Hudson, I will take apart the back roof when the sun comes out and get to the root of the problem. A leather chair is one thing, a Scotty is another. This, too, shall pass.
WHAT I DID: After relieving the total urge to scream and storm off, I weathered this storm and, just like when I started the project, I took it apart piece by piece to find the source. My twin mattress is soaked, so I've put that indoors with a fan and dehumidifier. I then removed the fabric wall I made and the foam behind it. Apparently the marker lights on the rear roof, streetside, are still leaking. So, when the rain stops I will figure that out. And, obviously, I need to replace the rear window where I removed the air conditioning. For a moment I forgot I was no longer in Southern California, so this is a chance I shouldn't have taken and one I'm paying for. BUT, I'm determined not to spend a penny to fix this.
WHAT I LEARNED: I've got to take the time to make sure things are water tight before moving on to the next project!!

Monday, June 20, 2011

Instant Gratification


This weekend found me getting down and dirty in Louis bathroom, a project I have put off since I bought him back in April. Why? Quite frankly, the tiny room scared me. It smells, I'm not sure how it works and I just didn't want to screw anything up. But, this weekend I decided to face that fear (especially after my maiden voyage when nature called at 3am and I was too tired to walk the 200 feet to the public restroom, a WORKING restroom can come in handy!) so I put on my work clothes and climbed underneath the trailer, determined to figure this thing out. Because I wasn't sure where to start, I took photos and posted them on the NSSO and SSCE sites for answers, which came in by the dozens. My main question was where does the "stuff" go, because I never saw a tank of any kind. While the commode is raised on a box, it is NOT a holding tank, so upon closer examination I realized that the tank was most likely removed at some point, or never there in the first place. There are lines from the water tank which fill the commode once the lever is pushed, but I believe a separate, portable tank is necessary. So, check that question off of my long list, and now it's time to head back inside and work on the pretty part, like getting rid of the moldy wallpaper and adding my own "flare." You'll have to check back tomorrow for the before and after shots of that because it was so muggy my paint wouldn't dry. But, here's a quick hint of what I've done...the floor (which also doubles as the shower floor with a drain in the middle) was rusty and pretty nasty. So, I grabbed a can of porch and floor paint in dark grey and used that (totally water proof, etc.) for a clean, dramatic look. While I waited for the paint to dry, I grabbed a cup of Joe and talked to my Joe...which reminds me of another little secret I discovered. I don't function in the morning until I've had at least two cups of coffee. On my maiden camping voyage my incredibly lovely mother-in-law, Peggy, made coffee by boiling water on her outdoor propane stove. This process took twenty minutes. By the time it was finished I was chewing bark off the trees around our campsite! Then I came home and discovered a lovely little secret at my local Starbucks...INSTANT COFFEE. Now, the thought of instant coffee often conjures up the image of watered down, tasteless coffee. This is far different from that! Dare I say, it's delicious, and I need not tell you what a coffee snob I am! Simply add hot water, stir and enjoy! Boxes of twelve of Starbucks VIA coffee start at $8.99, come in different flavors and ranges, and are available in stores and online at www.starbucks.com. Impatient like me? Wait not more, instant is just a few seconds away!

Friday, June 17, 2011

The Good Book


Ok, it's no secret that I've been remiss in posting any photos of work I've done on Louis because, quite honestly, it's been too damn hot or raining like the dickens, so I've been doing most of my work indoors. After my maiden voyage a few weeks ago, I took the opportunity to take notes on work I've done and make a list of all the things I've forgotten or haven't gotten to yet. One major thing on that list is addressing the bathroom/closet. I wish I loved the original wallpaper, but it makes me think of a sad basement or nursing home and it smells a bit of urine and moldy water. So, that will be first to go...but before I jump the gun and start redesigning the pretty parts, I have to figure out how the nuts and bolts of it work. A previous owner attached a clothes rod in the middle, which comes in quite handy, so I hung my clothes and stored outdoor chairs, etc. for travel. However, after a few Vodka Tonics campside, three AM came around quickly and when nature called I wanted nothing to do with walking out in nature, so just tested out the facilities in Louis. To my surprise, it wasn't the tragedy I thought it might be. Instead, it left me with several questions. So, I came home and quickly sent out a question to the SSCE and NSSO groups, to which I got amazing replies. So many, in fact, I was a bit overwhelmed. So, just like I'd advise someone attacking a home project to dial themselves down and look at each individual part, I decided to print up the original Scotty manual and all advice from both sites. This way, I have all the answers to my questions in one, cohesive place (you know how difficult it can be to sift through hundreds of emails looking for answers). After a few minutes, I've got an owners manual (with thanks to the great information posted on the SSCE site). I also added photos of other peoples redo's so I can take my binder with me out to the trailer, study it and get to work. The next photos I post here will hopefully be of that Scotty Potty getting a much needed makeover!
WHAT I DID: Hoped on over to Target and picked up a cool binder and protective plastic sheets so my papers don't get dirty or wet. Came home and jumped on the SSCE site, printed up the pages for the Hilander Manual along with emails of advice, and plopped them in the book. Sure, if you buy a Mercedes today they'll give you the owners manual on an ipad, but my version suits me just fine!

Wednesday, June 15, 2011

Follow this tip and you'll never slip!


I'm sure more seasoned campers already know little tricks like this, but I was happy to discover a great little idea for keeping things in place while driving all over the place. I've loaded the cabinets of Louis with vintage finds I've collected throughout the year and I'd rather not pack and repack 5,000 times, so to keep everything from flying around, I popped into the Dollar Tree store in our neighborhood and for $1.00 bought slip-free shelf liners. One roll covered my cabinets and utensil drawers. When I arrived at camp last weekend, 100 miles of windy, mountainous road later, I was pleased to find everything exactly the way I left it. In fact, this is the photo I took upon arriving...nothing is out of place, just the way I like it!

Tuesday, June 14, 2011

A Window into the future


As soon as the temperature drops low enough on the east coast to go outside, so do the raindrops...and lots of them, so I haven't been able to do a lot of the projects I've wanted to attack on Louis after his maiden voyage. Instead, I've made a list of all of the little projects that can make you completely insane, and have decided to start checking those off my long list while I wait for Mother Nature to cooperate. I started this project with a very tight budget and that, like the economy, hasn't changed so I'm trying to stick to it! I used to drop $300 on jeans without blinking an eye (which makes my left eye twitch now thinking about it) and, as much as I want an awing on Louis, I just can't justify spending $300 on one. So, I have decided to make my own...and think I can do it for less than $20, but you'll have to check back after the sun comes out for that project. In the meantime, as I said, it's the little projects that often get ignored (at least in my house) that have to be done. Take the screens on the windows, for example. And, Mr. Serro, who knew such a little trailer could have SO MANY?? When I bought Louis the screens were fine, yet aged and a bit "crumbly" for lack of a better term. Add my unseasoned swing of an axe to remove the back bunk, and well, you've suddenly got a tear in a screen window. Flash to an evening in the trailer, and I have a family of mosquito's feasting on my skin. Because we were in the process of screening in one of our back porches at home, I used those same materials for Louis (which happened to be the same size) but I noticed at both Home Depot and Lowe's a roll of screen and the rubber casings wouldn't cost more than $20. I did not, however, splurge on the $8 tool suggested for pushing the rubber into the slots around the window. I opted for my pizza cutter with a piece of painters tape wrapped around the blade to keep it from cutting my rubber.
HERE'S WHAT I DID: I laid my first window out on a large, flat surface and removed the old, dirty screen. I then cut a piece of new screen, a slightly darker tint to make the trailer a bit cooler inside, about six inches wider all around and secured it to the flat surface with strong tape, making sure it was tight over the window. I then slowly laid down the long, coiled rubber molding inside the grooves and pushed it in with my pizza cutter. While one window took me about a half hour, I'm sure I'll get faster as I go along. Hopefully, with a little care, these will last a long, long time!
WHAT THIS PROJECT COST ME: Not a penny

Tuesday, June 7, 2011

Made-In Voyage


I've been away from an Internet connection, so not able to blog, as I took Louis out for his maiden voyage to Mongaup Pond, New York, a campsite about 90 miles northwest of our home in Garrison, NY. I learned several things on this short trip away in my new vacation home on wheels, mainly I have a LOT of work to do. So, before I start on my next project (the bathroom) let me share a few things I learned this weekend:
1.) I have a Toyota Land Cruiser which gulps gas like nobody's business, so I filled her up ($95.00), hooked Louis up and went on our way. The day was crisp and clear but incredibly windy. While it's a fairly uphill drive from here, I found myself "punching the gas" on the hills, which duh, sucked the gas right out. So, I slowed down and enjoyed the journey. At the end of my 220 mile roundtrip journey (with a few rides into town for firewood, etc.) my gas guzzler averaged 12mpg, which isn't terrible. LESSON: Slow down!
2.) Because I wanted my first experience to be perfect, I rushed several projects that ended up (literally) falling apart in transit: mainly the trim work around a new cabinet, etc. I discovered it was time to take my own advice, much like I give to clients when designing a home. Don't get overwhelmed by the projects entirety, but break down the pieces and attack them one by one. So, today I will take down my half-a##ed trim work and start over. LESSON: Taking time to do it right, is indeed the way to get it done properly the first time!
3.) One of my favorite things about this trailer is its size, small enough to light the entire thing up with one lantern and several battery operated candles. I didn't need electrical hookups, just my cool little battery operated lights and solar string for all the illumination I needed. LESSON: While I plan on updating the electric, I know how I use this trailer and don't need it right now! Want vs. NEED.
4.) Dryer sheets are a great way to keep the bugs away! AND to keep rodents out of the trailer when placed in drawers, etc. HOWEVER, the LESSON here was NOT to get the overly scented ones! My trailer ended up smelling like a cross between a whore house (not that I've been) and a used car salesroom.
5.) Getting on the ball; again, I learned to SLOW DOWN when I hooked up initially and couldn't figure out how to get the tongue all the way down on the hitch. It's okay to restart and do it again. LESSON again, SLOW DOWN.
6.) Make a camping list. How did I leave out chocks of all things??? Well, I got busy filling my new cooler and didn't make my check list, so I've devised a general "weekend camping" list on my computer which includes everything from toothpaste to an extra tarp just in case. LESSON: be prepared by making a list.
7.) And, finally, the overall lesson of this journey was to enjoy the moment. Mongaup Pond was such a beautiful, peaceful sight and the entire reason I got into camping as a kid. Getting away from the hustle and bustle of life and just enjoying it...not worrying about what the SSCE or NSSO will think of my half-finished project when they see it. Just enjoy the process and the point of it all.
Tomorrow, the bathroom project begins!

Tuesday, May 31, 2011

Memory Weekend


Or shall I call it, "starting to LOSE my memory weekend" as I turned one year older on Saturday, I sat back to reflect on the last year and thought....well, who am I kidding, I sat back and thought about the last seven weeks of owning Louis and how much pleasure it has brought me. Before I head out on my maiden voyage on Friday with Joe's stepmother (the only person that will go with me...she's taking her pop up, I'll be in Louis) I proud of the work I've done for the (relatively) little money I've had to do it with. So, before I forget, here are the totals thus far on the work I've done on Louis, my great little Scotty:
Purchase Price: $500.00
NY Registration/Title Fee: $125.00 (yes, I passed out on the floor upon hearing that one!)
Aluminum for inside ceiling and repair walls: $145
Rustoleum paint for exterior (three colors): $55.00
Insulation from Home Depot: $27.50
Retro Aqua and Grey wallpaper from Amazon: $64.50
Canvas to use as fabric for dinette seats: $12.50
Aluminum tape for seams and roof: $5.50
New tires and bearings: $218.00
TOTALS (Minus purchase price and registration fee) $528.00
My goal was to spend no more than $500 in this first round of restorations, so I think I'm pretty close. Now, obviously I haven't included the thousands of great things SCOTTY I've found on ebay and elsewhere, like the smudge pots photographed here on my astroturf (6x8 astroturf rug was $18.50 on Amazon, smudge pots were $25 at Plow & Hearth and keep the bugs away while looking cool and retro), my solar lights from Ikea, etc. What I learned this weekend is that this entire process is energizing and fun AND, while I didn't camp this weekend, I had just as fun making my own party in our backyard. Of course, I'm headed out to the trailer soon to push ahead with my bathroom project and many, many more so keep coming back for stories from this little guy doing a little trailer reno!

Friday, May 27, 2011

Oh Sh*t!


Well, it finally happened. I've been storing my tools in the bathroom of Louis and finally got brave enough to open the door, remove the tools and figure this room out. Why I'm so perplexed by this area is still beyond me. Maybe it's the thought that people have used this for more than thirty years and how do I actually CLEAN thirty years of junk out of my trailer. Or, more likely, it's just the practicality of this room. Quite honestly, I most likely won't ever use it if I'm at a camp ground unless nature calls in the middle of the night. I certainly won't ever use the shower (because, of course, I like long, hot showers) but the designer in me wants to maintain the integrity of my Scotty, so I've decided to redo this room and started by reaching out to both Scotty trailer groups to figure out where to start. What a wealth of information that was! So, here goes...check back for after pics. In the meantime...here's what I learned this week:
1.) humidity hit the east coast this week and the inside of Louis sweat just as much as I did! So, I hooked up our LG dehumidifier (purchased at Home Depot for $250, which usually lives in our basement in the summer months) and let it go. LESSON LEARNED: Don't do this on a hot day, wait to do it at night and crack a window. My newly laid wood floors buckled and so did I! However, I quickly re-glued them, placed heavy weights on them and today they're back to normal.
2.) Aluminum siding tape (from the Home Depot for $5.50 a roll) is the best thing since sliced bread. For whatever my caulk didn't dry before a storm passed through earlier in the week and the back right light leaked once again. Desperate for it to STOP, I placed aluminum tape around it and WOWZAH, problem solved!
3.) I usually hate anything scented (candles, etc.) but Home Depot and Lowe's both sell a great room deodorizer (actually absorbs smelly odors) for $3, which works like a charm.
4.) My best purchase yet for Louis: solar powered outdoor indoor lights. Lasted all week inside and create great light on their own and..
5.) I purchased an 8x10 astorturf rug on Amazon.com for $15 and battery operated fan for $5.

Monday, May 23, 2011

Stars and Stripes


I've taken a break from posting because it has rained for what feels like months, making it slightly difficult to work on Louis. Saturday, however, the sun finally came out, so I grabbed my bag of tricks and headed outside to enjoy the sun and get some work done! As I creep closer to my budget ceiling (I told myself I wouldn't spend more than $500 on the renovation), I have to be careful where I spend and what I can salvage. Take the curtain rods, for example. The originals were gold and one of the first things I ripped out and tossed into the garbage, which ironically, are the first things I've pulled out. I initially thought I would use fishing wire, pulled tight, as rods then realized I was being wasteful by throwing out the rods, so I dug them out and spray painted them with a Rustoleum silver paint I had left over from another project. Another subtle add I made, was to continue the aqua stripe around the wheel well and down the side of the trailer. Two fairly simple projects, both free (I used left over aqua paint as well) that take Louis one step closer to camp and road-ready!

Friday, May 20, 2011

Behind Curtain #1


I love a nice view. This shot was taken a few months ago from our home, looking north at the Hudson River and West Point. I have yet to put anything on our windows, and probably won't, because in my humble opinion putting any coverings on the windows would distract from our view. This is usually the case with most interior design projects I tackle; for sleeping, I love black out shades, but during the day I prefer to have windows open, uncovered, making a room beautiful and bright. When it comes to my Scotty, however, I think I want a little privacy when camping, so today I'm tackling the project of window coverings. Now, I don't sew. I auditioned to host a show on the Discovery Channel a few years ago and in the middle of the audition the director said, "in the next set up you are going to sew curtains with the home owner." I turned bright red and almost wet my pants, to which the director asked, "you DO sew, don't you??" Lights, camera and NO action, because I had no clue how to turn on the sewing machine! If only I had my good friend Michael to help back then...Michael's arts and crap store, that is! I say crap, because boy oh boy are these craft stores full of it, but I sifted through the mounds of junk (actually just asked for help) and found iron on tape or double stick tape specifically designed for people who don't have the time or know how to sew. A few cuts of the fabric, a nice fold at the top for the rod to slip through, double stick tape and there you go! While they'll most likely be pulled open during the day so I can enjoy the view, they will be nice when I want a long, dark snooze!

Wednesday, May 18, 2011

Flash Back Wednesday


With flash flood warnings zipping across the bottom of our television this morning as I sipped a cup of coffee and tried to watch the top stories, the first thought that came to mind was, "that damn trailer better not leak!" I used to love the rain, but after buying Louis and spending countless hours trying to fix every leak only to spring one this weekend in the middle of a huge storm, to say I felt defeated and overwhelmed is an understatement. So, to feel better about my progress (and help out someone who asked about doing a reno from the inside without a full skin replacement) I thought I would look back at a few pictures of what Louis looked like four short weeks ago. What I did was remove one piece at a time and, where wood was rotted, replaced it with a new piece in the exact spot. When I talk to a client about a renovation project, to keep them calm, I remind them to look at the individual pieces that need attention, not the project as a whole. If you try to think of every step that must happen to finish any project, it might seem overwhelming. Start with the simple steps. With that advice in my head, I went outside, lifted the tarp and was determined to figure out where Louis had sprung a leak. FOUND IT. One of the lights in the back of the trailer on the roof had lost its rubber coating, causing water to seep in and, in turn, ruin my day. But, I simply grabbed a tarp and will wait for a dry day to fix it. One step at a time. At least I was finally able to narrow in on this annoying little leak.

Tuesday, May 17, 2011

When it rains it pours right off!


I noticed a few questions on various trailer sites this weekend about painting the outside of a trailer, and here's what I did to make Louis shine when he was far from divine (if you've forgotten what he looked like when I brought him home, just scroll up and look at the lead photo on this site...yep, he was quite a sight to be seen!). Because I don't have the time or money to do a complete overhaul of Louis, I simply wanted to repaint him. The previous owners had painted the burgundy color with a paintbrush, with thick brush strokes present in the application. While remaining true to the Scotty heritage of trailers, with it's signature Aqua colors, I also wanted to make this trailer my own. So, the color scheme on my trailer is silver, aqua and white. I chose to use ALL Rustoleum paints, because in my many years of interior design and construction work, Rustoleum paints tend to stand the test of time on decks, outdoor sheds and fences, etc. So, I sanded the entire trailer down with a wire brush and started applying the paint. After two weeks of almost non-stop rain, one look at Louis and I can see how wise it was to use Rustoleum (if you look closely you can see the water bubbles and rolls down, just like it's supposed to do). Other paints, like outdoor house paint (which many people have tried on trailers) doesn't do the same thing. So, if you're looking to paint, look no further than the aisles of Walmart for Rustolem's collection. If you are color matching, Ace True Value also carries Rustoleum and will colormatch anything. (upon close examination you will also notice the Scotty emblem I picked up on ebay, clearly it isn't the proper one for the exterior but, until I find the right one this will have to do!)

Monday, May 16, 2011

Positive Setbacks


Well the interior Designer/perfectionist in me wants only to report on beautiful, creative, fun progress but, sadly, just as is the case in life, sometimes things are just crappy. After spending several days repairing leaks on Louis, the northeast battled a weekend of heavy rains. Sunday morning, after a night of heavy rain, I crept into Louis like an anxious parent checking on a kid. Front area below the rock guard (where we'd leaked before), CHECK, No water!! However, in the rear above my daybed was a blob of wet muck! My pillows, sheets, mattress and fabric wall were all soaking wet. Upon close examination, I realized I had left the window open. Oops. This morning, just a typical Monday, I headed out in the pouring rain with coffee in hand to check on Louis again (obsessive? yes, but I finally have my trailer and I'm thrilled!!!) to find him leaking like crazy in the back. Instead of throwing my coffee at a tree, stomping around like a child and pulling Louis into a ravine, I decided to look at the positive side of my progress. The other areas of the trailer were NOT leaking after several strong storms. So, I grabbed a ladder and headed off in search of the problem spot. One thing I did BEFORE reading advice from others, was to apply roof tar to the seams on the roof. This was, hands down, one of the dirtiest jobs I've ever done. And, aside from my Scotty, I've renovated my own homes, so I know what it's like to get down and dirty. Roof tar was a pain in the rump, took days to dry and (clearly) didn't work in all places. So, that lesson learned. Until the rain stops, I just covered up the back roof with a tarp, went inside Louis and enjoyed my cup of Joe. Sitting at the dinette, I admired my new cabinet. Another positive part of this project.
WHAT I DID: Walking the aisles of Lowe's searching for wood to rebuild the over sink cabinet (the original was rotted beyond repair), I noticed pre-made units for close to the cost of the materials I was using to build the cabinet. AND, the work was already done. So, in this instance, I decided to cheat a bit and used the Lowe's brand. Because I removed a heavy wall unit, I'm not adding anymore weight to my trailer. To be safe, I added extra supports in the wall behind the stove and sink and used metal "L" shaped support brackets on the top and bottom (similar to what is used in joints in homes). Of course, I added my own flare by placing wallpaper inserts in the middle of each door, which I will most likely replace with a metal mesh or stainless steel.
WHAT IT COST ME: $38 for this unfinished piece that fits perfectly above the stove and sink.
HOW DIFFICULT: I just took my time (something I rarely do) and made sure brace supports were in place, supported cabinet with pieces underneath so I could install it alone and it was a breeze!

Friday, May 13, 2011

Out of the box cooking


Today marked the six week point from when I pulled Louis in rain, snow and a heck of a lot of wind from his home in Pennsylvania to our place in the Hudson Valley. While I'm not totally finished with my renovation process (I still need a rear window, new tires and work on the lighting system) I decided to throw an impromptu cocktail party and light dinner in my trailer tonight. Why the heck not, I say! I invited a few friends who have never been inside a camper, much less camped in one. It was also a good way for me to try out a few things before I hit the road...how does that lighting work over there, how many more pillows do I need on the daybed to make it comfortable, do I need to reinforce the benches, etc. So, while my next blog will get back to my restoration pictures, I thought this one would take a little vacation from the nuts and bolts of the trailer and to something I will actually DO in the trailer. One of my friends asked if I would just eat "out of the box" when I camp, to which I glared at her and began to prepare my totally homemade, delicious (dare I say), easy to make Vinaigrette salad dressing. I keep old jelly jars because they are perfect for shaking things up at the campsite. Here's what I do:
Because this dressing can last up to four days (or more) I prepare it at home, so I don't have to bring all the extra ingredients to camp. In a measuring cup I prepare the following:
2 Tablespoons white wine vinegar
1/2 teaspoon dijon mustard (I usually squeeze a bit more in as it makes it extra yummy)
2 minced garlic cloves (once I chop them, I add a little salt and smash together with the bottom of a spoon, then pour it in)
1/4 teaspoon salt
1/8 teaspoon freshly ground pepper
1/3 cup of olive oil
I whisk all of this together until well blended, then dip the handle of my spoon in for a little taste. Pour the rest in the jar and I'm ready to go. Once we get to camp I shake it up and pour it on!

Thursday, May 12, 2011

Mirror, Mirror on my Trailer wall...


The Google Blogger system has been down for a little over a day, so I'm catching up a bit. So, one of my finds while shopping for clients homes were these cool, retro round mirrors at Ikea for $19.99. They're simple, chic and totally perfect for the Scotty, so I wanted to put it somewhere. The front side of the bathroom wall proved to be a perfect spot because it gives the person sitting there the allusion that the space is bigger and not as cramped, and you can lean against the window wall and still see the action that's going on outside. To mount the mirror I headed to the hardware store and picked up metal mirror brackets, worried the plastic ones would be less sturdy. Took two seconds and I love the result!

Wednesday, May 11, 2011

Ouch, and other lessons learned


The title of this blog, Aqua With Envy, kinda says it all. I haven't blogged in over a week because the perfectionist in me was embarrassed after cruising the Serro Scotty Enthusiasts website and reviewing the totally fantastic, PERFECT rebuilds of its members Scotty's. I'm envious of the drive, passion and love people have for these little gems. I wish I had the time, patience and money to completely restore Louis to his old glory, but I just don't. So my "paste it together and make it work" strategy often gets me down when I look at the sheer genius people have put into their trailers. But, I got over that last night when I sat in my Scotty, sipping a cheap glass of white wine and reviewing what I have done since my last post. Well, first things first. A painful lesson I learned in my Attention Deficit Haze of attacking ten projects at once, I zipped around the front of the trailer (the tongue) and boy did I ever get a tongue lashing! One quick hit to the shin, and I'll never do that again! To ensure I never make that mistake, I placed a bright orange cone infront of the trailer A.) so no one pulls too close and B.) so this distracted trailer buff doesn't smash my shin again! So, my find this week was Martha Stewart Storage bins at Home Depot for $5.95/each. I was planning on building an under bed storage area but didn't want to block my access to the side compartments or the rear trunk area, so these seemed like a great storage solution for towels, clothes and other camping essentials. Next up was my stove, and boy was it a mess!! In unscrewing the top, it revealed pieces of the wall that had fallen next to the burners, an old lighter (thank God I found that one!) and many other bits of junk and grime. I took a brillo pad and sandpaper to get rid of rust stains, and used my same can of Rustolieum spray paint in Aqua (Beach Blue) I picked up at Wal-Mart and a can of Rustoleum black appliance paint in mat finish I also found at Wal Mart for $2.77. For an inexpensive solution, I think I brightened up this dull stove in a few minutes!
WHAT I DID: Took the two screws out of the stove from the front, carefully pulled out the burner clips and burners, washed them thoroughly, painted them in open air with the appliance paint and reinstalled.
HOW LONG IT TOOK: About a half hour from start to dry time.
DIFFICULTY: Not at all!

Tuesday, May 3, 2011

PROGRESS REPORT


As a kid I mastered the fine art of forging my mother's signature to avoid the pain and grief of producing a substandard report card. My parents were not hard on us at all, don't get me wrong, it was the internal shame that beat the crap out of me. How could I be so stupid to fail math? Why don't I understand Biology or care one bit about History? Well, times have changed (sort of). I still don't understand the point of Calculus in my business (never used it in hosting a show or designing a room...), but WOW, history was made this weekend, wasn't it? Wherever you fall on the political fence, you must believe progress was made this weekend. Where it will take us, who knows. In our neck of the woods another bit of history was made, or remade as it was. Louis got a much needed interior makeover this weekend. If the real Louis were still alive, he would roll his eyes at the wallpaper, I'm sure, but say nothing but positive things about my progress. I'm creating a flashback interior to the 70's using this great wallpaper I found on Amazon (tempaper for $56) which I'm using to accent the aluminum and white interior. So it isn't too overwhelming, I am breaking up the aqua and sliver paper with white walls on the refrigerator wall and kitchen wall. I think it's looking pretty cool but I have a long, long way to go! If I were grading myself I'd give it about a B- so far and in the world of Serro Scotty Enthusiasts and what I've seen them do to their trailers, I'd give myself a C-.
WHAT I DID: The wallpaper I found is a waterproof, reusable paper called Tempaper, specifically created for designers who stage homes for the real estate market. Throw this paper on a wall, wait until the house sells then take it right off with no problems at all. If you want to keep it, it is moisture retardant and can survive just about anything. In Louis where the walls did not need total replacement yet, I created a few blemishes when removing the ceiling and other walls. To fix (or hide) those, I covered them with the paper. Now that I have a stainless backsplash, wood floors and aluminum ceilings, the paper is a nice way to give it a funky twist.
HOW MUCH IT COST ME: The aluminum ceiling cost $45 for a 4x8 panel, which took three to cover the entire roof. The wallpaper was $56, and the patience to do it all: priceless

Friday, April 29, 2011

THE UGLY TRUTH


Sharing these photos is kind of like going to the wall in your underpants. I'm embarrassed, for whatever reason, to peel back the layers and reveal the ugly truth. But, it's part of moving forward I guess. This is the part of the story where I get a bit overwhelmed in the rebuild process (I know I'm jumping all around here in the chronological order of photos on this blog, but I was getting ahead of myself). I knew I would be shocked by what I found when I peeled back the exterior wall, but this floored me! However, to keep from totally spinning out of control I simply removed ONE section at a time. I took detailed photos so I could put it back together when the time was right, and kept all crucial pieces (rot or otherwise) so I could make the EXACT piece again (note in photo where I recreated a side support). So, just when you start to question why you've taken on this project, look at the tiny pieces as one huge victory at a time. When I replace a piece of rotted wood with a clean, new piece (big or small) I know I'm one step closer to getting on the road!
WHAT I DID: Focused on the worst sections first, starting on the bottom and working my way up. Instead of ripping apart, I slowly peeled the old away so not to destroy any pieces I may need to copy or reuse.
HOW MUCH THIS COST ME: Not a penny. Again, I'm reusing wood from home projects to keep costs down.
HOW STRESSED I WAS: Stress was high, but I had to step back and realize it's just one step at a time.

Thursday, April 28, 2011

GOOD ON PAPER


The title of this blog, "Aqua with Envy" is not meant to communicate that what you will see transform in my trailer is something to be envious of. Rather, the hundreds of photos I've seen of other people's renovation and restoration projects on both Scotty Enthusiasts websites have made me envious of the vision, drive and pure passion people have had for these great little trailers. Quite honestly, it's also scared the heck out of me. Just like renovating an old house (or new, for that matter), you never know the scope of the project until you open up the walls. And the walls in Louis were a MESS! Where water damage was obvious (some of the plywood walls has rotted to the point of turning into a substance that looked like sand) I removed the rot and replaced the wood with new pieces, new insulation and, at times, an aluminum barrier with Tyvek to protect the wood. Even if I didn't need to replace some of the interior walls the damage was a bit unsightly, something a little primer and paint would NOT hide. So, I did a little research again for "vintage" and "retro" wallpaper covers. I knew that traditional paper would most likely not work because of the drastic changes of weather in the northeast. Our incredibly humid summers would probably peel paper in no time. I put my Interior Designer hat on and found a great company, Tempaper, who designs wallpapers specifically for people with changing tastes and tight budgets. If you're staging a home for the real estate market, these hip wallpapers might be just the trick for, say, a half bath to hip it up and sell that house! Easy to install and even easier to remove, the papers are made of thick, durable plastic with interesting, retro yet modern designs. If you like the look and want to keep it, no problem. The paper will stay in place as long as you like. To hide a few of the blemishes on my walls and hip it up a bit, I bought a roll of Tempaper on Amazon.com for $56. Urban Outfitters also sold the same paper for $76/roll and the www.tempaper.com website sells for $76/roll as well. One roll covers 56 square feet, so lemmie get rolling and see how this one turns out!
WHAT I DID: Researched vintage papers and found this great, durable brand.
WHAT THIS PROJECT COST: $56 for a roll of paper which was delivered via Amazon in two days
HOW DIFFICULT THIS PROJECT WAS: So far, so good. Just unroll the paper, stick it and you've got a great look in no time. I'll post photos tomorrow if it turns out the way i want it!

Wednesday, April 27, 2011

JUDGING FROM THE OUTSIDE


So, my little Louis was in pretty bad shape when I picked him up in Pennsylvania earlier this month. In retrospect, I probably took on a much bigger project than I initially anticipated. He leaks more than an employee at Wikileaks, wood is rotten in most spots, smells like mold and, well, needs a heck of a lot of TLC. But, I'm prepared to do that and look forward to the (continuing) challenges of owning an older trailer. One of the first things I wanted to do was repaint the outside of the trailer, maintaining some of the Scotty's integrity with that signature Aqua (which I found at walmart in a Rustoleum brand), yet putting my own signature on the look. I love the silver and aqua together and, after a few major rainstorms, can see how valuable the Rustoleum paint is as the water literally rolls off! A few extra additions I made to the outside was purchasing reflector lights at walmart for $1.65/each, two in red and two in orange. I placed the round reds on either side of the front and the orange on the sides in the rear. While not totally necessary if all other lights work, the more approaching vehicles can see in the dark of night, the better in my opinion. A few other items I added to the outside were found on ebay: the rear Serro Scotty decal I purchased for $15 and original red and black plastic logo for outside the door. While I hate to label, sometimes it's necessary!!
WHAT I DID: went to the camping section at walmart and purchased four reflector lights for under $2/each ($1.65 to be exact). On ebay, searched "Serro Scotty" and found a decal for the back of the trailer and an original logo for the side.
HOW LONG THE PROJECT TOOK: Less than ten minutes
WAS IT DIFFICULT? Not at all and, actually, love the way they look!

Tuesday, April 26, 2011

A SILVER LINING


I had a minor setback this weekend, after two weeks of painstaking renovations on Louis, we had several storms pass through the area. While I covered Louis with tarps, he still leaked....all over the new beadboard in the dinette area. To say I was a bit depressed, especially after peeling back the skin, replacing the new wood, covering it in Tyvek AND Aluminum, is an understatement. But, I guess that's the same thing that happens with home ownership. Right when you think you're finished with a project or happy with what you've got, something takes a giant crapola on it! So, instead of ripping the skin off yet again, I secured the area a bit tighter with more tarp and plastic, deciding to put that project off for a later, dryer day. Instead I focused on the ceiling, which turned out to be another minor setback. In my minds eye (which tends to focus much easier than my REAL eyes), I pictured a stainless ceiling, bringing a more modern twist to my old Scotty. Well, if you've priced stainless you know it's a fortune, so I turned to the less expensive, easier to work with (or so I was told) alternative of ALUMINUM. This was also the most expensive part of my renovation. At $45 for a 4'x8' sheet, it will take three to cover the ceiling and area behind the stove, leaving me a few extra pieces for exterior work (I placed it as a barrier between the exterior shell and wood on the front, where my tow vehicle water might splash more than normal amounts of water, ignoring the side panel which leaked). Well, Aluminum is NOT as easy to work with as I had hoped. It's hard to cut (I purchased aluminum sheers which you should DEFINITELY wear gloves while working with the sharp edges) and a challenge to drill through. Once I got it up, however, I was pleased with the results. A little aluminum shiner, and my finger prints will be gone!
WHAT I DID: Went to a local lumber yard and purchased three 4x6 sheets of aluminum and aluminum cutters at Home Depot
HOW MUCH THIS PROJECT COST: About $150
HOW DIFFICULT: Removing the skin and old wood was FAR easier than this project. But, a deep breath goes a long way!

Saturday, April 23, 2011

WHAT'S IN A NAME?


My Grandpa Louis taught me the fine art of loving the outdoors. Summers spent with Grandma and Grandpa in Leroy, Michigan created memories I won't ever forget. Fourth of July weekends found everyone they knew camped out on the 80 acres of green, peaceful bliss. I, an adventurous kid, would run from trailer to trailer asking for tours of these grand weekend homes on wheels. One year Grandpa Louis was so brave he offered to watch me and my two brothers (I was four, Dwight was six and John ten) when my Grandmother, Mom and Dad flew to Europe. Louis hooked up the 1975 Argosy to his Buick LeSabre and off we went from Grand Rapids to Leroy, with me in the back seat staring at the trailer the entire time, making sure it didn't fall off. Two days of pouring rain, three kids fighting over who got to sleep on the sofa and poor Louis had had enough. We hooked her back up, closed down camp and headed back to Grand Rapids. I've never forgotten that trip with Grandpa. One year Louis surprised Grandma Helen by purchasing a 1971 Titan, and oh was she ever surprised! After the initial shock wore off, Grandma saw Louis vision; to drive across country visiting relatives along the way, escaping the cold, harsh winters of Michigan. When they arrived in Silver City, New Mexico for Christmas (where we were living at the time) I begged Grandma and Grandpa to sleep in the RV with them. I loved every minute of it! Louis was a quiet, fairly introspective man who loved his family and adored spending time with his grandchildren. He passed away just before Christmas this year, and now that I live so close to Michigan, it saddens me that I can't pull up in my Scotty and surprise him with a weekend of camping only he could appreciate. But, I'm sure he's somewhere looking down with a grin of pride and admiration, just as I do when I sit in my Scotty thinking about what he has done to open my eyes to this adventurous world. So, I will name my Scotty, "Louis" after the man who taught me to step outside of my box and enjoy the outdoors!
(Photo taken approx July, 1978 at Grandma and Grandpa's cabin near Leroy, Michigan.)

THEN I WAS FLOORED


When I bought the Scotty he had been renovated (like some homes) by people with very different taste than mine. No judgements, of course, but it looked like a Pizza Hut, complete with red stained carpet and red accents everywhere. When I removed the red carpet it revealed the cool, very 70's yellow and brown linoleum original to the Scotty. Sadly, where the previous owner skimped on carpeting the whole floor, they painted bright red. So, I headed to Lowe's to find another alternative, planning to get stick tiles of some sort. What I found surprised me. Now, I wouldn't put these in your home unless in a basement, laundry, etc. but these stick wood strips came in 4"x24" pieces for $1/each. Colors varied from dark to light, so I went right in the middle with an oak finish. Sure, it's not staying true to the integrity of the original design, but I thought it looked nice and will go well with my stainless/retro green/fabric walled ensemble I have going on here. Hopefully it won't look like a hooker den when I'm finished!!
WHAT I DID: Bought one box of laminate sticky wood strips at Lowe's for $32.50, and went to town sticking them on the floor for a great finish.
HOW LONG IT TOOK ME: Less than an hour!

Friday, April 22, 2011

A BLANK CANVAS


Because I'm trying to do this renovation as inexpensively as possible (before I resort to holding a sign on the street corner that reads, "will design for wine") I'm trying to use a lot of the ideas I've executed in home staging projects. After walking the aisles of Home Depot searching for inspiration, I came upon canvas drop cloths (12'x12') in white and tan and, I thought, that would be great fabric. While most likely next to impossible to sew, it's easy to staple gun it! In a master bedroom I created a headboard by using plywood, foam and the $5 drop cloth I bought at Home Depot to design a clean, modern almost linen-look. So, why the heck not do the same thing in Scotty? Because I'm going to use the back bed as a daybed, I wanted it to be more warm than the front dining area. Because the trailer is so small, by the way, my plan is to create "areas" to give the illusion of a larger space. So, I've attached bead board to the front dinette wall which will be painted a very similar to Scotty-aqua. The rear area I wanted to be more warm and comfy for reading, chatting, watching SOMEONE cook (I don't), so I thought fabric would be really cool. The ceiling will all be aluminum so I didn't want that to come down next to where I'm sleeping, so I attached the canvas to the top of the windows and staple-gunned away, carefully cutting around the openings with an exacto knife. The fabric can then be rolled up or down (like campers of the 40's).
WHAT I DID: Took that Home Depot Canvas and went to town. Because it's so easy to work with and inexpensive, it's okay if I screw it up!
COST OF THIS: Again, I used left overs so NOTHING, but 12'x12' run about $5-$8 at Home Depot and would make great seat cushions too!
HOW LONG IT TOOK: About twenty minutes