Thursday, September 1, 2011
Back to basics
I love gadgets and after Irene ripped through our neighborhood and Louis' left side, I'm happy to have things like my iPad, IPhone and iPod. That said, it makes me insane that I can't figure out how to upload photos from the last few days on my iPad. Power, you guessed it, is still out in our neck of the woods five days after Irenes not so classy exit. The storm, however, also reminded me how important it is to prepare for natural disasters (the southern Californian in me is well aware of the importance to stock pile for natural catastophries). As campers, I think we are a few steps ahead of the rest. My battery operated candles have not died yet, the Coleman lanterns I purchased at target light up our dark nights and the stove in the Scotty has already prepared several warm meals on the last few cool evenings. Back to modern conveniences for just a second...the photos I wanted to share were of the progress I've made with the post Irene makeover of louis. Dare I say, I think he will be back up and running by next week! I used this setback as an opportunity to make Louis better than ever. In my initial restoration of him I only removed the front and rear skins, ignoring the sides because they were in pretty sound shape. Now I've been given the opportuniy, thanks to mother nature, to add new insulation and an extra protective layer of tyvek (used in home projects to protect exterior plywood). Luckily I had extra tyvek and insulation from Louis part one, so no money was spent on this project. Once the power is back on I will add photos to this post to share, but until then it's back to Louis I go!

Tuesday, August 30, 2011
COME ON, Irene!!!

Well, it's officially the calm AFTER the storm of Irene. I realized, after walking our property and seeing the fallen trees, our driveway turned into a gushing river and, finally, a huge tree fallen on Louis, that I have nothing to complain about. Things happen. Mother Nature has a way of putting a road block in front of you every now and then, but at least we are here to talk about it today. So, while I was a bit depressed about the new wide-open space on the side of Louis, I'm excited to put him back together and get camping already! To inspire me even more (and maybe a slight ADD distraction) I went on vistaprint.com today and ordered coffee mugs of Louis' progress from when I brought him first home until last week, when I was sipping cocktails in him, proud of the work I've done to bring him back. While he dries out in the bright sunshine today, I will head to the hardware store, grab a few essentials and get back to work on putting him back together. Upon closer examination, while Joe said "it's a total loss" I took the less dramatic road and realized, after doing this once before, if I SLOW down and look at each piece of this puzzle, it really isn't that tough to fix. Well, I'd better leave Starbucks, head to the hardware store and get back to work. I will post pics of Louis once our power is back up and running!
(By the way, the coffee mug idea is actually really cool and only costs $5 at www.vistaprint.com. Upload any photo and you'll have your mug (s) in less than two weeks!)
Monday, August 22, 2011
Of Mice and Scared Man

I'm sure you might be asking what on earth the photo above has to do with mice and men, but I will get there. Since my last entry I've been crazy busy with work so I could prepare to take a week to travel to Michigan for my Grandpa Louis' memorial service. If you've been reading my blog you know I named my Scotty after my Grandfather, who showed me how to appreciate the great outdoors in his huge backyard in the Great Lakes State. Last time I was in Michigan we buried my Grandmother, so returning for an equally sad occasion wasn't terribly uplifting. As the smart ass of the family, however, it is my job (or at least I think it is) to keep the mood light, family happy and entertainment going. I had intended on taking my Scotty, Louis, to Michigan and camping on my grandparents property near Cadillac, Michigan in the middle of the state. With gas prices soaring and limited time, I decided to fly so I'd have more time with my family. Before I left I asked Joe to please check on Louis (trailer) every day, peek inside to make sure nothing leaked and just say "hello" when walking by (is that too much to ask, I thought?). Well, apparently it was. I was pleased to find NO LEAKS upon my return after several major down pours, however I walked in this morning with my cup of Joe and paper, opened a drawer to grab a spoon and yet out a yelp heard around the Hudson River Valley...someone had been enjoying Louis while I was a way! Actually, from the look of it, many someone's were enjoying him. Mouse droppings EVERYWHERE. Now, I was always under the assumption that mice followed food, so of course I never, ever leave food anywhere near the trailer. First on my list today is to find a way to get rid of these nasty critters (why didn't the snake I saw weeks ago eat them???). I've heard dryer sheets work (I did that, so apparently they don't), so I need to find another alternative that won't leave the little critters dead in my trailer. Stay tuned. In the meantime, while in Michigan tooting around on my Uncles boat in Lake Charlevoix, I spotted a sail cloth similar to this one and thought it was a really cool way to shade beach-goers, AND would make for the perfect protection for Louis back in New York. I popped on the internet and discovered that everyone under the sun, including Ikea, sell them (many for well under $100) so I jumped in my car and headed to Ikea. The sail cloth I found for $79 is 25' square, so covers him perfectly. If nasty rains do beat down on us, at least he'll have a little more protection! Now off to Home Depot for suggestions on how to get rid of these nasty critters...if you have any, please email me!
Friday, August 5, 2011
Flex like the Pros


Rinse. Lather. Repeat. Well, I mentioned back in June we had a few powerful rainstorms come through our area and right through Louis they went! Just when I thought I had him buttoned up, he leaked like crazy! Instead of throwing in the towel, I grabbed several, dried him up and tried again. This time I listened to the experts of the NSSO and the SSCE sites who had talked about using Proflex and Butyl tape to stop leaks. I had used everything BUT these products and, guess what, none of them worked! A previous owner attempted to seal the leaks with roof tar which, I'm sure you can imagine, is like putting a mixture of peanut butter and honey on your roof. It's a gooey mess and attracts everything from road debris to bugs yet does nothing for leaks. I tried every possible bottle of caulking available at Home Depot and Lowe's, resisting the 75 mile drive to the nearest Camper Supply store. Finally, after the June leaks, I decided to make the trek up to Campers Barn where I found the tape and ProFlex. So, I went back to the drawing board, replaced wet wood with dry, ripped out my fabric wall, primed and painted the area inside, reconfigured the bed and put several strips of the Butyl tape on the seams outside of the trailer and added Proflex anywhere I thought might leak. Last night, with a summer storm descending upon us, I decided to sleep in Louis for the night to make sure he was leak free...better to figure that out at home than on a long camping journey! To my surprise, I woke up rested and DRY! Next time, I need to listen to the pros FIRST. But sometimes lessons are found in little mistakes and bumps along the road!
WHAT I DID: one tube of ProFlex cost me $8 and the tape, I believe, was around $36 which made me gasp BUT, it worked! I climbed on my ladder and covered each seam with the butyl tape (comes in white and black) and along the tongue to tail seams on the roof I added ProFlex (with a caulking gun) to any open areas.
Wednesday, August 3, 2011
Behind Window #3


In my family if I ask for someones opinion I usually get 10. If I don't ask for an opinion, I get at least 20! When it comes to working on this great little Scotty, however, I love all the opinions and advice I've been getting to make Louis as perfect as he can be..or at least as good as I can make him! I've obviously been in a little battle with myself about where to place an Air Conditioning unit and have received countless great ideas. However, as I've heard over and over, no two Scotty's are alike (or something like that), as is the case when opening up a cabinet where something should be, only to find nothing but mouse droppings and dog hair. While someone might have almost the same trailer as mine, maybe I have an extra door where they don't or a water tank positioned a tad different than theirs. Yet one more thing that makes these trailers so unique in my opinion! The latest advice on where to place my cooling system, I believe, is what's going to work best. Thank you, Rose, for opening my eyes to something that was right in front of me that I never would have seen had my nose not been pushed right into it. My 79 HiLander has a rear escape hatch (that sounds cooler than it is, it's actually an emergency window exit). Now, I'd certainly seen the red window pulls and markings for an emergency exit but assumed it would fly off, blast out into the universe, never to be seen again. Well, this isn't the Space Shuttle, it's a Scotty and, thankfully, that didn't happen. Rose suggested I open this when at camp and place an ac unit in the opening. Why didn't I think of that? So, now I just need to design a shelf with support brackets strong enough to hold the unit on the outside of the trailer and some kind of insulation so I don't look like a cast member from the Beverly Hillbillies when at camp. Once again, I asked and I received some great advice from my Scotty pals. Thanks so much...now I've got to go cool off!
Monday, August 1, 2011
Two steps forward, one project behind

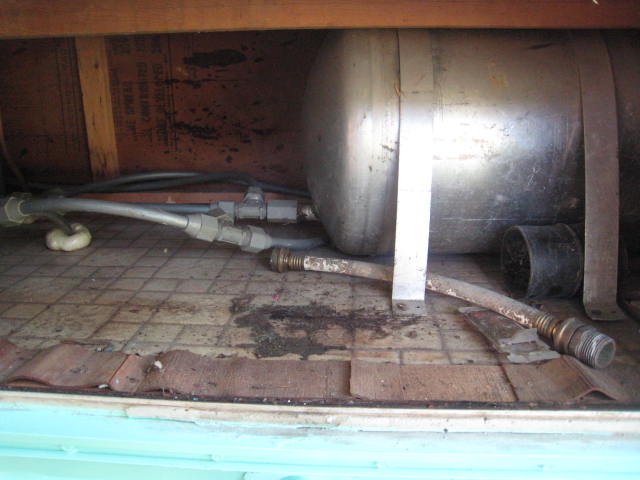
Well, ADD kicked into high gear this weekend, clearly. When designing a clients home I usually like to be left alone because my process is quite frenetic. I'll place a sofa in a corner and move it to another room five minutes later. Design, in my mind, is an organic process, constantly evolving until the perfect look and feel is achieved. This process doesn't necessarily work all of the time, as was the case today when I went to cut the opening for my new ac unit in Louis. Yesterday, excited to get a jump on this project and desperate to see progress before demolition, I adjusted the bed size inside (mainly so I could add a bit more room and not hinder airflow if the ac was hidden under the bed). When I opened Louis rear (that sounds awful...but looking at it I did have to laugh), I noticed my water tank blocking the space where (in my minds eye) I thought was the perfect spot to slip in an ac unit. It's always something, huh? For a nano second I thought about moving the tank but it just doesn't look like that's possible. So, back to the drawing board I go, most likely placing the ac back in the window in the rear. As I mentioned before, I'd like to make this a mobile unit, so in the winter or when I don't need the AC I can leave it at home and not have the eye sore of a big bump out my rear window. Anyway, I'm happy with the new sofa/bed situation inside, but I've got to think a little bit more on the placement of the ac. Humm.
Saturday, July 30, 2011
Making my bed and sleeping in it


This weekend was positively gorgeous on the east coast. Warm, dry and crystal clear so it seemed like the perfect opportunity for me to get working on installing an air-conditioning unit before the sweltering heat and humidity returns like an unwelcome relative. So, to start the process I had to re-address another project I attacked shortly after buying Louis. I removed the overhead bunk, not only because it was totally rotted out, but because I will never need that space as a sleeping area and I wanted to acquire more headroom for adults sitting on the rear sofa. Initially, mostly to save money, I placed a twin mattress from a daybed we had on the back bed area. It was comfortable for sleeping, but as you can see it took up more space than I realized (I had to pull the unit out to almost full-sleep mode at all times). If I'm installing an ac unit under the bed from the outside, I need to cut a hole under the bed, so assumed I'd get rid of the twin and bought foam from the Hobby Lobby (thanks for the great tip, Becky!). I'm not a big guy (5'11" and about 170 on a good day) so pushing the bed back to sofa size is just perfect for me. Where I lost the under bed storage with my sassy aqua colored bins, I created shelving for them on either side of the bed. I was SHOCKED at what just a few square feet can do..literally about eight...but it makes a world of difference. Now I've placed the dining table back where it goes and can put my folding table next to the sofa when I'm using it as my home office. Next step, cut the opening and insert the ac unit!
WHAT I DID: To prepare the bed for adult sleeping AND the twin mattress, I reinforced the bed supports back in April. So, I removed them, took the mattress out and purchased two 76" x 27" foam pieces at Hobby Lobby for 30% off (about $36). Placing them both on top of each other, I've created a comfy sofa and great sleeping area.
Tuesday, July 26, 2011
Back to the rear

There's been a lot of talk about my rear-end lately, actually Louis behind, because I'm trying to figure out where to place the air conditioning unit without jeopardizing the overall look of my Scotty. Chances are John Serro didn't have a giant GE humming behind his head as he slept in his Scotty's, so why should I...was my initial thought. Then, humidity forced me to come to my sense. So this weekend I perched on a chair in front of Louis with a cold margarita and drew a plan to install a rear window with hinges, allowing me to slip in a unit while at camp and remove it when I didn't need it. Thanks to one of my SSCE buddies, Wendy, I have a better idea. I believe the rear trunk area on Louis was not original to the design, but I could be wrong. I have a tiny hatch in the back of the trailer to access items stored under the rear bed. So, smart Wendy came up with a brilliant idea...stick the ac unit THERE. Humm. Why the heck didn't I think of that? The opening is 14" high by 24" wide, perfect for slipping in an ac. In an effort to shave some pounds off his rear while in tow, I will NOT do a permanent install. Instead, I can still use the area for storage, etc. and when it's hot and muggy outside, I can slip the ac unit in the back and chill out. This weekend my first project will be cutting a hole under the bed area from the inside, installing a grate over it (I happen to have a stainless panel left from some interior cabinetry work I did on our house) and prepping the storage area with tracks on either side to support the ac. One more example of where it pays to have good connections. Thanks, Wendy, for helping me cool down on a hot summer night!
Friday, July 22, 2011
Exposing my back side


It aint always pretty, I know, but I felt the need to let it all hang out because, quite honestly, I can't do this one on my own. And, if you're in my relationship boat and have a partner with zero interest in helping on a restoration project, then you know where I'm coming from. In my research, chats, and midnight browsing of Scotty's on ebay, the SSCE and NSSO sites, I've learned that no two Scotty's were made EXACTLY alike, which makes this project a wee bit difficult. As mentioned in previous posts, I ripped the AC unit out of the back of Louis mainly for aesthetic purposes. Now, in the heat of summer (and I promised not to complain anymore about this, but Jesus, when did we move to Vietnam??) I'm beginning to see the value in having a cooling option on hot days. Now, the designer in me is taking a slightly different approach to this project. Because I still feel the AC unit in the rear is a bit of an eyesore (and heavy in tow), I thought of creating a hinged window...stay with me here...I'd like to replace the space left by the previous owner with a new (old, that is) Scotty window and hinge it on the bottom. That way, for winter or spring campouts when an AC isn't necessary, I can keep the unit at home and enjoy the nice window. When it's hot, humid, and I want to scratch my face off I can lower the window, insert the ac and enjoy a calm, cool vacation. So, here's the plan (and where I need suggestions, please). I'd like to create a seamless frame along the side of the window which, in turn, will act as supports when I put the window down for the AC. I've got the window design, hinges, etc. in my mind, but the question I'll put out there (and email me at paul@paulhechtdesigns with suggestions), is how to insulate the edges when in ac mode to keep the other summer annoyances out..BUGS! So, I think I can manage the window but need advice on the rest. And off I go.......
Thursday, July 21, 2011
Cooler heads prevail

I think I've officially complained about the summer heat in the northeast enough, so in an attempt to cool myself down I plopped an air conditioning unit in Louis' window (to test the weight, where I might need extra supports when at camp, etc.) and got to work on a few interior tweaks. When I design a home, including my own, I have a plan in mind but rarely do I ever stick to that plan. A design plan may look perfect on paper, but in the room reality can look very different. Joe is often frustrated when he comes home from a long day, throws his keys where the key-catch was that morning, only to discover I have moved it to another room. What can I say, I enjoy a little variety, so tend to re-design our rooms every other month. So, why should my Scotty be any different? I like testing textures, colors, etc. and had a problem with my original Dometic refrigerator. When I brought Louis home the refrigerator, while in working condition, looked better suited for the set of the "Brady Bunch." In fact, it looked like it hadn't been touched since the 70's; rusted, moldy, and in dire need of attention, I wanted to give it a bit of a face lift. Originally I thought stainless steel paint would be the best choice, but a few months later, true to form, I changed my mind. This old Dometic, in my opinion, looks much better in a cool, Scotty blue!
HERE'S WHAT I DID: To rid this old fridge of it's musty smell I cleaned it thoroughly, inside and out, with Clorox bleach and prepped the outside with a good-old brillo pad to get rid of the chipping paint and rust spots. After priming with a few coats of Z-primer, I applied two coats of the same semi-gloss Scotty Aqua paint I bought at Lowe's (formula is in a previous blog or on the SSCE site). The extra coat of primer means it will stand the test of a few finger nail scratchings and still look fabulous!
WHAT IT COST AND HOW LONG IT TOOK: This project cost me nothing because I used paint from a previous project and had the brillo pads. Including waiting for the paint to dry (with air-conditioning running), total time for project was under an hour.
Wednesday, July 20, 2011
Joanie loves Tchotchke


I'm sure the die hard Scotty restorers will simply look at this and move right on to someone else's blog, but the little pieces of any project are always part of the bigger picture, in my mind. We recently moved from California to New York state, and don't get me wrong, I love our new home in the Hudson Valley. However, I can't stand the humidity! When I open our front door and walk outside, it feels like Oprah has tackled me wearing a wool suit. Hot, still, suffocating and totally disgusting. So, to escape the heat I've turned my focus to accessorizing Louis. After my maiden voyage last month I commented to one of our members that I didn't understand how larger individuals snuck into the dinette area. I'm not a big person at all (5' 11" and 165lbs) and I can barely do it without knocking everything off my table. I LOVE the original table and plan on finding vintage Scotty blue Formica someday when I can afford it, but for now I just want a comfortable space where I can hang out with Joe, sip a vodka tonic and enjoy Louis. So, I removed the table and created an area under my daybed in the back to store it in a safe place (details of HOW I did this will come in a later blog). I then popped over to Ikea and purchased this great stainless folding table I can use in or outside for $12. It's perfect for two people and makes plenty of room for easy entry and exit. Of course I couldn't stop just at Ikea. It's no secret that I love to collect everything from yellow ware and McCoy pottery to Jadeite and fiesta ware. Yes, I love tchotchke's, but I like to think my approach is fairly tasteful. So, now, my obsession is everything 70's I can find. Target had a sale on these modern-looking cocktail napkins and Scotty blue stripe for $.50/pack. I found the reversible placemats at walmart for$1.99, the vintage metal picnic basket with faux-wood grain finish (figured I would use this as a nightstand next to the bed, place books and flashlight, etc. in it) was purchased at an antique store for $10 and my favorite find to date is another Ikea find: the solar powered, adjustable lamp for $19.99! Simply pop out the solar panel, let sit in the sun for at least twelve hours then enjoy a bright night (well, at least six hours!). So, as my "Louis List" sits with no additional red check marks next to projects, I'm closer to having enough camping accessories to make it a guaranteed good time!
WHAT I DID: While sitting in an air-conditioned Starbucks (our hundred year old farmhouse does NOT have air-conditioning), I jumped on my ipad and created a design on my house planner app. I'm trying to figure out a good place to install my new air conditioner without it looking horrible. When it cools down I'll attack that project, in the meantime I picked up awesome things for my next campout at Target, walmart and Ikea. Nothing too expensive, just fun things I can use for years to come.
(and, yes, you'll notice my back cushions are missing in these photos as I'm attempting to teach myself how to sew. THIS should be interesting and will also be a later blog!)
Tuesday, July 19, 2011
Hot and bothered

I overheard my father say he was an "ass man" and, quite honestly, I threw up a little bit in my mouth! But, hey, good for him, I guess. I, too, appreciate a good looking behind, so when I brought Louis home in April I thought the air conditioning unit sticking out of his behind looked like a hemorrhoid in dire need of attention. Before I unhooked Louis from my truck, I popped that AC unit out of the back window (cut open by a previous owner and rigged in pretty tight). This was, hands down, one of the most difficult projects I attacked on my restoration project. Clearly the previous owner did a darn good job in getting this puppy in the Scotty, because it took me the better part of two hours to get it out. That was April. It was cool, breezy and I couldn't imagine needing AC in this tiny, little abode. Now it's mid-July and the Hudson Valley feels like Vietnam and I keep finding myself asking, "did I make a mistake taking that out? I still DESPISE the way it looks in the back (no offense to anyone that has one similar), but there must be a way to pop one back in (I found a used AC unit on Craigs list, met the guy in a parking lot because I'm still a little Leary of the Craigslisters, and snagged this one for $25!). So, here's what I've done (after pics will come shortly), but I've figured out a way to slide it in when I'm at camp, making it secure enough that bugs and water won't get in. Maybe it's just my giving up on finding a replacement window, or the heat is getting to me so much I've thrown my design aesthetics out the window!
(photo is louis on the day after I brought him home, before tearing out the awful eyesore)
Monday, July 11, 2011
What's in a label?


When I was a kid I loved everything IZOD. Many days would find me sporting the alligator on my shorts, shirt, sun visor and even socks. To me, Izod (and maybe OP) symbolized everything that was cool in my seven year old eyes. Today I am less concerned with labels, in fact I try to run away from them as often as I can. When it came to restoring my Scotty, however, I have searched high and low for every possible Serro item I can find. When I owned Airstreams it was fairly easy to find everything from ashtrays to throw pillows, doorknobs for a Bolus to wheel covers for a Bambi. Scotty searches, however, haven't been as easy. A fellow newbie Scotty restorer, Amy, emailed me the other day a bit frustrated after finding a few spots of water damage in her Scotty. Anxious to get camping and thrilled with her new purchase, Amy ordered curtains, planned her redecorating adventures and headed out one rainy night to check on her new getaway...only to find it leaking like a water filled piece of cheese cloth. I told Amy not to fear because I'd been right where she was last week. And the week before, and last month...My excitement to see progress, get camping (coupled with a bit of Attention Deficit Design Disorder) had me painting the outside first, purchasing new flooring before ripping up the old, etc. But, that's just part of my process. Part of illuminating the light at the end of my reno tunnel was to purchase Scotty stickers for the front and back of Louis. I found these by doing a quick search on ebay, and purchased two for $19.99/each. I told myself I could NOT put them on Louis until he was finished. Something so simple helped me push ahead when I felt like pulling louis out of the picture for a while. When the Serro Scotty Labels arrived in the mail I knew I was close to the end of my project and closer to camping. Now, this photo doesn't represent the finished project by any means, but it was far enough along in my opinion to label the roof "finished" by adorning it with the Scotty pup. So, Amy, take one day at a time, one drip at a time and know that you're one step closer to the finish line!
Friday, July 8, 2011
Movin' on UP


Louis has come a long way in the last few months. When I set out on this mission to find an inexpensive trailer I never thought I would find something as interesting, yet challenging, as this little Scotty. Despite the many challenges along the restoration way (my budget being the main one) I never lost focus of my main goal: to create a cool weekend escape on wheels where I can get away from the haste of my day and retire to the cool, comfort of the great outdoors. I've had a few people email me from the Scotty group for advice on how to restore their trailers and, while they loved the photos of my work, they were most impressed by my total lack of trailer restoration knowledge! Humm, now that's a first! But, I understand what they were looking for. When I walk into my mechanic and describe what rattle is banging around the explanation is often heard as though I were in the first day of an advanced Chinese course (I've only studied Spanish and French). In other words, the easiest explanation is often the best. Amy and Wendy, who are pushing ahead with their restorations with gusto, have emailed asking various how-to questions and have met many, many bumps in the road. So, to them and for them, I take a quick peak back for a look at my process over the last few months. I don't have a garage to work in, I don't have an interested partner in restoration crime to work with, I only have my tools, a tiny budget and the help from my Scotty friends. I will tell you what I tell my design clients. Don't get overwhelmed in the messy details. When you start to paint a room you will think it's never going to end. Focus on that wall, that room and THEN the bigger project gets smaller and smaller.
Wednesday, July 6, 2011
Counter Productive

I'll admit my A.D.D is all over the map (isn't that what ADD is anyway??), so after purchasing another tube of proflex to ensure my roof is sealed tight, as I got the ladder out to head up to finish the task, I remembered five other little projects I wanted to knock off my list. While Joe laughed at me as I zigged and zagged all over our yard with various tools in hand, I knew I was being productive as I worked through my list. I'm envious of the gorgeous vintage countertops I've seen in trailers on both Scotty sites, but I just can't afford to put that money into Louis at this time. However, his counters leave a lot to be desired. Several stores sell contact paper that mimics countertop tile, but I just didn't want to go that route. Until my budget goes a little higher for this reno, I came up with a simple, quick, clean solution. I sanded and cleaned the counters, re-glued the trim strips and painted two coats of Porch and Floor paint in high gloss white. Because the finish is perfect for high-traffic, outdoor spaces I knew it would survive a few bumps and bruises from my camping dishes. Someday I'll have those vintage countertops, but for now they're looking pretty good!
HOW MUCH THIS COST ME: Actually, I used paint we already had so NOTHING. However, I purchased the quart at Home Depot for another project for $8.99!
Tuesday, July 5, 2011
Strip tease

I have to say, every time I look out our front door at Louis, nestled in his corner surrounded by trees and flamingos, I just have to smile. Then I start thinking about the number of projects I have left and my eye begins to twitch. Like I've said before, it's the little projects that take up so much time and can be a bit overwhelming when looking at them as a whole. So, I chip away at them day by day. One project that was weighing heavily on me was the sewing and installing of curtains. A.) I don't sew and B.) I've had a sewing machine for several months, still sitting brand new in its box and I just don't want to face it. So, as I mentioned last week, I headed to the Christmas Tree Shop (love this place for all kinds of cheap finds, www.christmastreeshop.com) where I found, what I think, are the perfect curtains for Louis. Each set for $5.99 includes two 36" panels and a valance. By purchasing four sets I can cover all of the windows (two valances go on the front window, the other two go on the small upper windows in the back area, longer panels go on all other windows). So, for a little under $30 I found cute, great curtains for Louis. One other little project I scratched off my list, was adding a white strip of trim in front of the storage baskets I have under the daybed. When I travel I can leave all the contents in the baskets and not worry about them flying all over the trailer in route. Little trim, little liquid nails and I've got a lot of security for my storage!
Thursday, June 30, 2011
Feeling a little blue

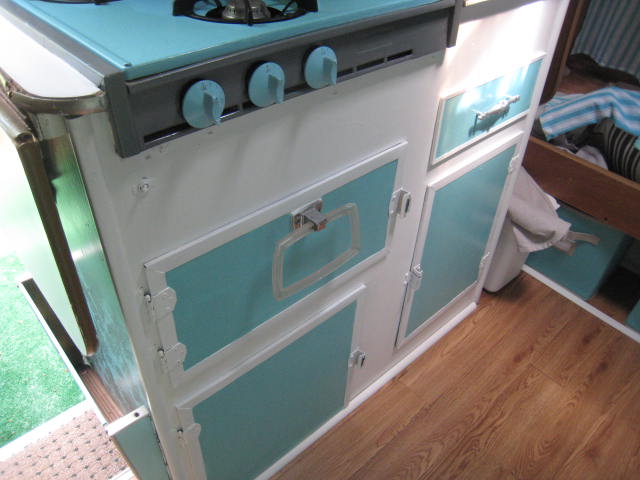

A quick glimpse at my renovation receipts and, shock of all shock, the most money I spent was on SPRAY PAINT from walmart that I (bless my heart) thought looked close enough to the Scotty Aqua/Turquoise (I think it was a tad too blue). I've read on one of the two Scotty sites that some believe the 1979 HiLander switched to a Brown trim and moved away from the Aqua. This is NOT the case with Louis, as after I peeled off the Pizza Hut red I revealed the original color underneath with the yellow at the front. While normally I would take that sample in to Lowe's or Ace and have them scan it to match the color, I noticed on the SSCE site the color formula for the Aqua. The only difference when I went to Lowe's was they no longer sell oil based paint for environmental reasons. The previous owner brushed the red and silver colors on and I don't feel like sanding the entire trailer, so will do the same. I, however, like to splurge on a nice brush so purchased a Purdy brush. I bought exterior and interior high gloss and went to town! Yes, some might say I went a bit too far, but had a blast matching my new cooler with the old Scotty colors. To jazz up my cabinet doors a bit I added the color to the center panels. I love it and am so happy to have the matching formula!
WHAT I DID: Purchased a quart of exterior and one quart of interior HIGH GLOSS VALSPAR paint in this formula: Base 1, 101-5.5, 102-6.5, 103-31
Sunday, June 26, 2011
Naughty Potty


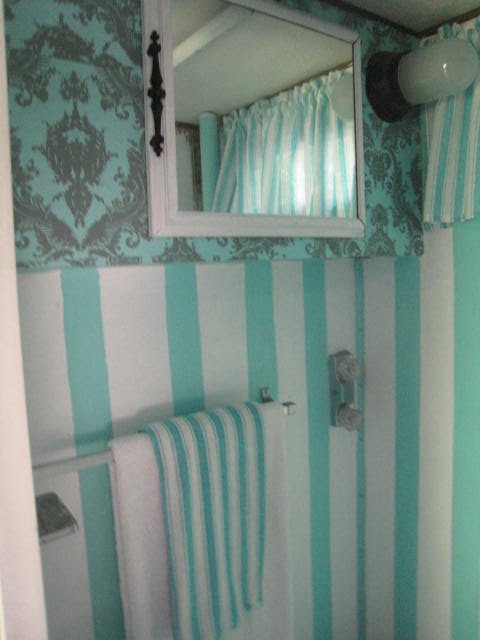
Finally the rain stopped, humidity stayed away for at least a day and I had enough time to drag a fan out to Louis and let the paint dry. So, here's what I've done to make this Scotty Potty a little more interesting. As I've said, this part of my redesign was the last on my list, because I just didn't think I would use this as a bathroom at all..UNTIL my maiden voyage. I don't like brushing my teeth in a public restroom (call me a snob) and having a late night place to release without walking through the dark woods was yet another added bonus. Plus, if and when I ever sell Louis, I'm sure the added feature of a wet bath will come in handy. After I figured the toilet situation out (where it leads to, how to clean and dump it, etc.) I felt much better. With my initial plan in mind (to spend as little as possible) I used paint I'd already had for other projects, adding my own little flare so now people won't mind going in there!
HERE'S WHAT I DID: The main interior of Louis is wallpapered with my great find from Amazon, cabinets are white and the dinette is painted turquoise/Aqua. I used three distinct colors/textures (wallpaper, white and Aqua) to make three distinct areas, giving the illusion of a bigger space. The Potty room marries all of these looks in one, funky, yet cohesive way. On the vanity I placed the same wallpaper as in the main areas. I removed the door, painted it white and updated the handle by painting it a mat black. Because removing the original wallpaper would be a pain in the neck and most likely result in more damage to the walls, I simply primed them with ZPrimer and added two coats of Semi Gloss bright white paint. For the floor I added a dark grey porch and floor paint. For that fun flare, I took the same aqua from the main area (mixed with both primer and paint at Ace Hardware) and painted stripes. Because I wanted these to trick the eye a bit (is it wallpaper or hand painted?) I did these freehand, without painters tape, no measuring distance between, etc. I love the somewhat artsy look of it (I drew lines on the wall with a pencil, made sure I didn't have too much coffee before I started to paint, and slowly followed the lines). For added protection on the floor (just in case it's ever used as a shower again) I added a coat of poly protectant. The only money I spent on this redo was $5.99 for the furry seat cover at Kmart (couldn't resist) and the valance curtain I pulled from a set I purchased at the Christmas Tree Store for $5.99 (set came with valance and two 36" curtains I will use in the main part of the trailer. Because we have 5,000 shower mats, I took one and cut it to size for the top of the toilet box. The interesting thing I noticed last night as we sipped martinis, you can actually create extra seating by having someone sit on the pot! Hummm
HOW LONG THIS TOOK AND HOW MUCH: Again, it was under $15 for my accessories and took two hours but almost a week to dry with the humidity and rain!
Thursday, June 23, 2011
Aqua light special


I don't usually shop at Kmart. In fact, I thought they were out of business until I was leaving the Lowe's/Christmas Tree Store parking lot yesterday and noticed a big, red "K" out of the corner of my eye. Because I'm always on the hunt for anything AQUA, I figured I'd pop in. Little did I know I'd return home an hour later to find a totally soaked Louis (scroll down two posts if you haven't seen what I'm facing today as my first project), so I was in bliss when I found these great items on sale. The chairs were a great steal, I think, at $14.99/each and the metal folding table was $34.99 and also came with a choice of metal folding chairs for $19.99/each (seems like they'd be a bit warm in the sun. What I was really on the hunt for and FINALLY found for under $5 was the final touch I was looking for in my Scotty Potty. Again, sorry for the delay in revealing the final photos, but I've got to get working on my new water damage before pushing ahead with the final touches on the potty room. At any rate, at the end of the day, in spite of everything frustrating that happened, at least I know there is a blue light special at the end of the tunnel!
Wednesday, June 22, 2011
I love a rainy day


I was born in Seattle so, naturally, I love a rainy day. Today where I live on the opposite coast it is raining cats and angry dogs, so I've decided to head out to pick up a few extra things for Louis since it doesn't look like I'll be able to finish my painting project in the bathroom any time soon. So, I jumped in the sleigh and headed to the north pole. Actually, I jumped in my Land Cruiser and headed north to Poughkeepsie, New York to the Christmas Tree store where I found these great curtains for Louis for $5.99!!! The valance fits the front and rear windows perfectly, and each set comes with a valance and two 36" curtains. I love, love, love them and it saved me from sewing!!!
HERE'S WHAT I DID: Stopped into the Christmas Tree Store and found this great set of curtains (two panels and a valance) for $5.99/set. Initially I had gone to Michael's arts and crafts store and purchased sewing tape (easily applied to back of fabric and either ironed on or double stick taped to create seam), but this is a much easier solution. And, because they're so inexpensive I can still make my Michael's version and, just like in my home, change out the look periodically to keep it fresh and interesting!
WHAT IT COST ME: $5.99 for a set, I bought THREE so I could put two valances on the front cafe window. You'll also notice the striped tablecloth I bought for $2.99. My idea? Place a piece of rope or window rubber (similar to what I used on the screen project) and roll it under one side, similar to piping on a chair or sofa. Then I will place that end in my awning strip on the trailer. Maybe it works, maybe it doesn't, we'll see. In the end, it's only $2.99 so if it won't work as a cheap awning, I'll recover a few outdoor chairs and use them when I'm camped at home!
And then there are times I can't stand the rain!!!


I remember buying an expensive leather chair at Restoration Hardware one year. I was so excited, yet stressed because I splurged on the purchase, but figured I'd worked hard enough and deserved it. Joe and I went out to celebrate with dinner that night and returned to find the $3,500 chair I'd just purchased chewed into a thousand pieces by our dogs, Bones and Canyon. In that moment I wanted to scream, cry and vomit all at once but instead I told myself, "I won't let this defeat me" and I didn't. We realized we had accidentally locked our doggy door (both Bones...passed away last year...and Canyon are rescue dogs and HATE being locked indoors) so, in an attempt to get out and TELL US HOW ANGRY THEY WERE TO BE LOCKED INSIDE, they destroyed the chair. Today, when I popped back into Louis midday to see if the bathroom was finished I smelled something musty and awful. I looked towards the back and this is what I found....again, my fault. I haven't replaced the rear window yet, only put a plexiglass quick fix up, so what did I expect? The other corner, however, I have no idea why is leaking. So, instead of pushing Louis off a ledge into the Hudson, I will take apart the back roof when the sun comes out and get to the root of the problem. A leather chair is one thing, a Scotty is another. This, too, shall pass.
WHAT I DID: After relieving the total urge to scream and storm off, I weathered this storm and, just like when I started the project, I took it apart piece by piece to find the source. My twin mattress is soaked, so I've put that indoors with a fan and dehumidifier. I then removed the fabric wall I made and the foam behind it. Apparently the marker lights on the rear roof, streetside, are still leaking. So, when the rain stops I will figure that out. And, obviously, I need to replace the rear window where I removed the air conditioning. For a moment I forgot I was no longer in Southern California, so this is a chance I shouldn't have taken and one I'm paying for. BUT, I'm determined not to spend a penny to fix this.
WHAT I LEARNED: I've got to take the time to make sure things are water tight before moving on to the next project!!
Monday, June 20, 2011
Instant Gratification

This weekend found me getting down and dirty in Louis bathroom, a project I have put off since I bought him back in April. Why? Quite frankly, the tiny room scared me. It smells, I'm not sure how it works and I just didn't want to screw anything up. But, this weekend I decided to face that fear (especially after my maiden voyage when nature called at 3am and I was too tired to walk the 200 feet to the public restroom, a WORKING restroom can come in handy!) so I put on my work clothes and climbed underneath the trailer, determined to figure this thing out. Because I wasn't sure where to start, I took photos and posted them on the NSSO and SSCE sites for answers, which came in by the dozens. My main question was where does the "stuff" go, because I never saw a tank of any kind. While the commode is raised on a box, it is NOT a holding tank, so upon closer examination I realized that the tank was most likely removed at some point, or never there in the first place. There are lines from the water tank which fill the commode once the lever is pushed, but I believe a separate, portable tank is necessary. So, check that question off of my long list, and now it's time to head back inside and work on the pretty part, like getting rid of the moldy wallpaper and adding my own "flare." You'll have to check back tomorrow for the before and after shots of that because it was so muggy my paint wouldn't dry. But, here's a quick hint of what I've done...the floor (which also doubles as the shower floor with a drain in the middle) was rusty and pretty nasty. So, I grabbed a can of porch and floor paint in dark grey and used that (totally water proof, etc.) for a clean, dramatic look. While I waited for the paint to dry, I grabbed a cup of Joe and talked to my Joe...which reminds me of another little secret I discovered. I don't function in the morning until I've had at least two cups of coffee. On my maiden camping voyage my incredibly lovely mother-in-law, Peggy, made coffee by boiling water on her outdoor propane stove. This process took twenty minutes. By the time it was finished I was chewing bark off the trees around our campsite! Then I came home and discovered a lovely little secret at my local Starbucks...INSTANT COFFEE. Now, the thought of instant coffee often conjures up the image of watered down, tasteless coffee. This is far different from that! Dare I say, it's delicious, and I need not tell you what a coffee snob I am! Simply add hot water, stir and enjoy! Boxes of twelve of Starbucks VIA coffee start at $8.99, come in different flavors and ranges, and are available in stores and online at www.starbucks.com. Impatient like me? Wait not more, instant is just a few seconds away!
Friday, June 17, 2011
The Good Book


Ok, it's no secret that I've been remiss in posting any photos of work I've done on Louis because, quite honestly, it's been too damn hot or raining like the dickens, so I've been doing most of my work indoors. After my maiden voyage a few weeks ago, I took the opportunity to take notes on work I've done and make a list of all the things I've forgotten or haven't gotten to yet. One major thing on that list is addressing the bathroom/closet. I wish I loved the original wallpaper, but it makes me think of a sad basement or nursing home and it smells a bit of urine and moldy water. So, that will be first to go...but before I jump the gun and start redesigning the pretty parts, I have to figure out how the nuts and bolts of it work. A previous owner attached a clothes rod in the middle, which comes in quite handy, so I hung my clothes and stored outdoor chairs, etc. for travel. However, after a few Vodka Tonics campside, three AM came around quickly and when nature called I wanted nothing to do with walking out in nature, so just tested out the facilities in Louis. To my surprise, it wasn't the tragedy I thought it might be. Instead, it left me with several questions. So, I came home and quickly sent out a question to the SSCE and NSSO groups, to which I got amazing replies. So many, in fact, I was a bit overwhelmed. So, just like I'd advise someone attacking a home project to dial themselves down and look at each individual part, I decided to print up the original Scotty manual and all advice from both sites. This way, I have all the answers to my questions in one, cohesive place (you know how difficult it can be to sift through hundreds of emails looking for answers). After a few minutes, I've got an owners manual (with thanks to the great information posted on the SSCE site). I also added photos of other peoples redo's so I can take my binder with me out to the trailer, study it and get to work. The next photos I post here will hopefully be of that Scotty Potty getting a much needed makeover!
WHAT I DID: Hoped on over to Target and picked up a cool binder and protective plastic sheets so my papers don't get dirty or wet. Came home and jumped on the SSCE site, printed up the pages for the Hilander Manual along with emails of advice, and plopped them in the book. Sure, if you buy a Mercedes today they'll give you the owners manual on an ipad, but my version suits me just fine!
Wednesday, June 15, 2011
Follow this tip and you'll never slip!

I'm sure more seasoned campers already know little tricks like this, but I was happy to discover a great little idea for keeping things in place while driving all over the place. I've loaded the cabinets of Louis with vintage finds I've collected throughout the year and I'd rather not pack and repack 5,000 times, so to keep everything from flying around, I popped into the Dollar Tree store in our neighborhood and for $1.00 bought slip-free shelf liners. One roll covered my cabinets and utensil drawers. When I arrived at camp last weekend, 100 miles of windy, mountainous road later, I was pleased to find everything exactly the way I left it. In fact, this is the photo I took upon arriving...nothing is out of place, just the way I like it!
Tuesday, June 14, 2011
A Window into the future

As soon as the temperature drops low enough on the east coast to go outside, so do the raindrops...and lots of them, so I haven't been able to do a lot of the projects I've wanted to attack on Louis after his maiden voyage. Instead, I've made a list of all of the little projects that can make you completely insane, and have decided to start checking those off my long list while I wait for Mother Nature to cooperate. I started this project with a very tight budget and that, like the economy, hasn't changed so I'm trying to stick to it! I used to drop $300 on jeans without blinking an eye (which makes my left eye twitch now thinking about it) and, as much as I want an awing on Louis, I just can't justify spending $300 on one. So, I have decided to make my own...and think I can do it for less than $20, but you'll have to check back after the sun comes out for that project. In the meantime, as I said, it's the little projects that often get ignored (at least in my house) that have to be done. Take the screens on the windows, for example. And, Mr. Serro, who knew such a little trailer could have SO MANY?? When I bought Louis the screens were fine, yet aged and a bit "crumbly" for lack of a better term. Add my unseasoned swing of an axe to remove the back bunk, and well, you've suddenly got a tear in a screen window. Flash to an evening in the trailer, and I have a family of mosquito's feasting on my skin. Because we were in the process of screening in one of our back porches at home, I used those same materials for Louis (which happened to be the same size) but I noticed at both Home Depot and Lowe's a roll of screen and the rubber casings wouldn't cost more than $20. I did not, however, splurge on the $8 tool suggested for pushing the rubber into the slots around the window. I opted for my pizza cutter with a piece of painters tape wrapped around the blade to keep it from cutting my rubber.
HERE'S WHAT I DID: I laid my first window out on a large, flat surface and removed the old, dirty screen. I then cut a piece of new screen, a slightly darker tint to make the trailer a bit cooler inside, about six inches wider all around and secured it to the flat surface with strong tape, making sure it was tight over the window. I then slowly laid down the long, coiled rubber molding inside the grooves and pushed it in with my pizza cutter. While one window took me about a half hour, I'm sure I'll get faster as I go along. Hopefully, with a little care, these will last a long, long time!
WHAT THIS PROJECT COST ME: Not a penny
Tuesday, June 7, 2011
Made-In Voyage

I've been away from an Internet connection, so not able to blog, as I took Louis out for his maiden voyage to Mongaup Pond, New York, a campsite about 90 miles northwest of our home in Garrison, NY. I learned several things on this short trip away in my new vacation home on wheels, mainly I have a LOT of work to do. So, before I start on my next project (the bathroom) let me share a few things I learned this weekend:
1.) I have a Toyota Land Cruiser which gulps gas like nobody's business, so I filled her up ($95.00), hooked Louis up and went on our way. The day was crisp and clear but incredibly windy. While it's a fairly uphill drive from here, I found myself "punching the gas" on the hills, which duh, sucked the gas right out. So, I slowed down and enjoyed the journey. At the end of my 220 mile roundtrip journey (with a few rides into town for firewood, etc.) my gas guzzler averaged 12mpg, which isn't terrible. LESSON: Slow down!
2.) Because I wanted my first experience to be perfect, I rushed several projects that ended up (literally) falling apart in transit: mainly the trim work around a new cabinet, etc. I discovered it was time to take my own advice, much like I give to clients when designing a home. Don't get overwhelmed by the projects entirety, but break down the pieces and attack them one by one. So, today I will take down my half-a##ed trim work and start over. LESSON: Taking time to do it right, is indeed the way to get it done properly the first time!
3.) One of my favorite things about this trailer is its size, small enough to light the entire thing up with one lantern and several battery operated candles. I didn't need electrical hookups, just my cool little battery operated lights and solar string for all the illumination I needed. LESSON: While I plan on updating the electric, I know how I use this trailer and don't need it right now! Want vs. NEED.
4.) Dryer sheets are a great way to keep the bugs away! AND to keep rodents out of the trailer when placed in drawers, etc. HOWEVER, the LESSON here was NOT to get the overly scented ones! My trailer ended up smelling like a cross between a whore house (not that I've been) and a used car salesroom.
5.) Getting on the ball; again, I learned to SLOW DOWN when I hooked up initially and couldn't figure out how to get the tongue all the way down on the hitch. It's okay to restart and do it again. LESSON again, SLOW DOWN.
6.) Make a camping list. How did I leave out chocks of all things??? Well, I got busy filling my new cooler and didn't make my check list, so I've devised a general "weekend camping" list on my computer which includes everything from toothpaste to an extra tarp just in case. LESSON: be prepared by making a list.
7.) And, finally, the overall lesson of this journey was to enjoy the moment. Mongaup Pond was such a beautiful, peaceful sight and the entire reason I got into camping as a kid. Getting away from the hustle and bustle of life and just enjoying it...not worrying about what the SSCE or NSSO will think of my half-finished project when they see it. Just enjoy the process and the point of it all.
Tomorrow, the bathroom project begins!
Tuesday, May 31, 2011
Memory Weekend

Or shall I call it, "starting to LOSE my memory weekend" as I turned one year older on Saturday, I sat back to reflect on the last year and thought....well, who am I kidding, I sat back and thought about the last seven weeks of owning Louis and how much pleasure it has brought me. Before I head out on my maiden voyage on Friday with Joe's stepmother (the only person that will go with me...she's taking her pop up, I'll be in Louis) I proud of the work I've done for the (relatively) little money I've had to do it with. So, before I forget, here are the totals thus far on the work I've done on Louis, my great little Scotty:
Purchase Price: $500.00
NY Registration/Title Fee: $125.00 (yes, I passed out on the floor upon hearing that one!)
Aluminum for inside ceiling and repair walls: $145
Rustoleum paint for exterior (three colors): $55.00
Insulation from Home Depot: $27.50
Retro Aqua and Grey wallpaper from Amazon: $64.50
Canvas to use as fabric for dinette seats: $12.50
Aluminum tape for seams and roof: $5.50
New tires and bearings: $218.00
TOTALS (Minus purchase price and registration fee) $528.00
My goal was to spend no more than $500 in this first round of restorations, so I think I'm pretty close. Now, obviously I haven't included the thousands of great things SCOTTY I've found on ebay and elsewhere, like the smudge pots photographed here on my astroturf (6x8 astroturf rug was $18.50 on Amazon, smudge pots were $25 at Plow & Hearth and keep the bugs away while looking cool and retro), my solar lights from Ikea, etc. What I learned this weekend is that this entire process is energizing and fun AND, while I didn't camp this weekend, I had just as fun making my own party in our backyard. Of course, I'm headed out to the trailer soon to push ahead with my bathroom project and many, many more so keep coming back for stories from this little guy doing a little trailer reno!
Friday, May 27, 2011
Oh Sh*t!

Well, it finally happened. I've been storing my tools in the bathroom of Louis and finally got brave enough to open the door, remove the tools and figure this room out. Why I'm so perplexed by this area is still beyond me. Maybe it's the thought that people have used this for more than thirty years and how do I actually CLEAN thirty years of junk out of my trailer. Or, more likely, it's just the practicality of this room. Quite honestly, I most likely won't ever use it if I'm at a camp ground unless nature calls in the middle of the night. I certainly won't ever use the shower (because, of course, I like long, hot showers) but the designer in me wants to maintain the integrity of my Scotty, so I've decided to redo this room and started by reaching out to both Scotty trailer groups to figure out where to start. What a wealth of information that was! So, here goes...check back for after pics. In the meantime...here's what I learned this week:
1.) humidity hit the east coast this week and the inside of Louis sweat just as much as I did! So, I hooked up our LG dehumidifier (purchased at Home Depot for $250, which usually lives in our basement in the summer months) and let it go. LESSON LEARNED: Don't do this on a hot day, wait to do it at night and crack a window. My newly laid wood floors buckled and so did I! However, I quickly re-glued them, placed heavy weights on them and today they're back to normal.
2.) Aluminum siding tape (from the Home Depot for $5.50 a roll) is the best thing since sliced bread. For whatever my caulk didn't dry before a storm passed through earlier in the week and the back right light leaked once again. Desperate for it to STOP, I placed aluminum tape around it and WOWZAH, problem solved!
3.) I usually hate anything scented (candles, etc.) but Home Depot and Lowe's both sell a great room deodorizer (actually absorbs smelly odors) for $3, which works like a charm.
4.) My best purchase yet for Louis: solar powered outdoor indoor lights. Lasted all week inside and create great light on their own and..
5.) I purchased an 8x10 astorturf rug on Amazon.com for $15 and battery operated fan for $5.
Monday, May 23, 2011
Stars and Stripes


I've taken a break from posting because it has rained for what feels like months, making it slightly difficult to work on Louis. Saturday, however, the sun finally came out, so I grabbed my bag of tricks and headed outside to enjoy the sun and get some work done! As I creep closer to my budget ceiling (I told myself I wouldn't spend more than $500 on the renovation), I have to be careful where I spend and what I can salvage. Take the curtain rods, for example. The originals were gold and one of the first things I ripped out and tossed into the garbage, which ironically, are the first things I've pulled out. I initially thought I would use fishing wire, pulled tight, as rods then realized I was being wasteful by throwing out the rods, so I dug them out and spray painted them with a Rustoleum silver paint I had left over from another project. Another subtle add I made, was to continue the aqua stripe around the wheel well and down the side of the trailer. Two fairly simple projects, both free (I used left over aqua paint as well) that take Louis one step closer to camp and road-ready!
Subscribe to:
Posts (Atom)