Thursday, June 30, 2011

Feeling a little blue


A quick glimpse at my renovation receipts and, shock of all shock, the most money I spent was on SPRAY PAINT from walmart that I (bless my heart) thought looked close enough to the Scotty Aqua/Turquoise (I think it was a tad too blue). I've read on one of the two Scotty sites that some believe the 1979 HiLander switched to a Brown trim and moved away from the Aqua. This is NOT the case with Louis, as after I peeled off the Pizza Hut red I revealed the original color underneath with the yellow at the front. While normally I would take that sample in to Lowe's or Ace and have them scan it to match the color, I noticed on the SSCE site the color formula for the Aqua. The only difference when I went to Lowe's was they no longer sell oil based paint for environmental reasons. The previous owner brushed the red and silver colors on and I don't feel like sanding the entire trailer, so will do the same. I, however, like to splurge on a nice brush so purchased a Purdy brush. I bought exterior and interior high gloss and went to town! Yes, some might say I went a bit too far, but had a blast matching my new cooler with the old Scotty colors. To jazz up my cabinet doors a bit I added the color to the center panels. I love it and am so happy to have the matching formula!
WHAT I DID: Purchased a quart of exterior and one quart of interior HIGH GLOSS VALSPAR paint in this formula: Base 1, 101-5.5, 102-6.5, 103-31

Sunday, June 26, 2011

Naughty Potty


Finally the rain stopped, humidity stayed away for at least a day and I had enough time to drag a fan out to Louis and let the paint dry. So, here's what I've done to make this Scotty Potty a little more interesting. As I've said, this part of my redesign was the last on my list, because I just didn't think I would use this as a bathroom at all..UNTIL my maiden voyage. I don't like brushing my teeth in a public restroom (call me a snob) and having a late night place to release without walking through the dark woods was yet another added bonus. Plus, if and when I ever sell Louis, I'm sure the added feature of a wet bath will come in handy. After I figured the toilet situation out (where it leads to, how to clean and dump it, etc.) I felt much better. With my initial plan in mind (to spend as little as possible) I used paint I'd already had for other projects, adding my own little flare so now people won't mind going in there!
HERE'S WHAT I DID: The main interior of Louis is wallpapered with my great find from Amazon, cabinets are white and the dinette is painted turquoise/Aqua. I used three distinct colors/textures (wallpaper, white and Aqua) to make three distinct areas, giving the illusion of a bigger space. The Potty room marries all of these looks in one, funky, yet cohesive way. On the vanity I placed the same wallpaper as in the main areas. I removed the door, painted it white and updated the handle by painting it a mat black. Because removing the original wallpaper would be a pain in the neck and most likely result in more damage to the walls, I simply primed them with ZPrimer and added two coats of Semi Gloss bright white paint. For the floor I added a dark grey porch and floor paint. For that fun flare, I took the same aqua from the main area (mixed with both primer and paint at Ace Hardware) and painted stripes. Because I wanted these to trick the eye a bit (is it wallpaper or hand painted?) I did these freehand, without painters tape, no measuring distance between, etc. I love the somewhat artsy look of it (I drew lines on the wall with a pencil, made sure I didn't have too much coffee before I started to paint, and slowly followed the lines). For added protection on the floor (just in case it's ever used as a shower again) I added a coat of poly protectant. The only money I spent on this redo was $5.99 for the furry seat cover at Kmart (couldn't resist) and the valance curtain I pulled from a set I purchased at the Christmas Tree Store for $5.99 (set came with valance and two 36" curtains I will use in the main part of the trailer. Because we have 5,000 shower mats, I took one and cut it to size for the top of the toilet box. The interesting thing I noticed last night as we sipped martinis, you can actually create extra seating by having someone sit on the pot! Hummm
HOW LONG THIS TOOK AND HOW MUCH: Again, it was under $15 for my accessories and took two hours but almost a week to dry with the humidity and rain!

Thursday, June 23, 2011

Aqua light special


I don't usually shop at Kmart. In fact, I thought they were out of business until I was leaving the Lowe's/Christmas Tree Store parking lot yesterday and noticed a big, red "K" out of the corner of my eye. Because I'm always on the hunt for anything AQUA, I figured I'd pop in. Little did I know I'd return home an hour later to find a totally soaked Louis (scroll down two posts if you haven't seen what I'm facing today as my first project), so I was in bliss when I found these great items on sale. The chairs were a great steal, I think, at $14.99/each and the metal folding table was $34.99 and also came with a choice of metal folding chairs for $19.99/each (seems like they'd be a bit warm in the sun. What I was really on the hunt for and FINALLY found for under $5 was the final touch I was looking for in my Scotty Potty. Again, sorry for the delay in revealing the final photos, but I've got to get working on my new water damage before pushing ahead with the final touches on the potty room. At any rate, at the end of the day, in spite of everything frustrating that happened, at least I know there is a blue light special at the end of the tunnel!

Wednesday, June 22, 2011

I love a rainy day


I was born in Seattle so, naturally, I love a rainy day. Today where I live on the opposite coast it is raining cats and angry dogs, so I've decided to head out to pick up a few extra things for Louis since it doesn't look like I'll be able to finish my painting project in the bathroom any time soon. So, I jumped in the sleigh and headed to the north pole. Actually, I jumped in my Land Cruiser and headed north to Poughkeepsie, New York to the Christmas Tree store where I found these great curtains for Louis for $5.99!!! The valance fits the front and rear windows perfectly, and each set comes with a valance and two 36" curtains. I love, love, love them and it saved me from sewing!!!
HERE'S WHAT I DID: Stopped into the Christmas Tree Store and found this great set of curtains (two panels and a valance) for $5.99/set. Initially I had gone to Michael's arts and crafts store and purchased sewing tape (easily applied to back of fabric and either ironed on or double stick taped to create seam), but this is a much easier solution. And, because they're so inexpensive I can still make my Michael's version and, just like in my home, change out the look periodically to keep it fresh and interesting!
WHAT IT COST ME: $5.99 for a set, I bought THREE so I could put two valances on the front cafe window. You'll also notice the striped tablecloth I bought for $2.99. My idea? Place a piece of rope or window rubber (similar to what I used on the screen project) and roll it under one side, similar to piping on a chair or sofa. Then I will place that end in my awning strip on the trailer. Maybe it works, maybe it doesn't, we'll see. In the end, it's only $2.99 so if it won't work as a cheap awning, I'll recover a few outdoor chairs and use them when I'm camped at home!

And then there are times I can't stand the rain!!!


I remember buying an expensive leather chair at Restoration Hardware one year. I was so excited, yet stressed because I splurged on the purchase, but figured I'd worked hard enough and deserved it. Joe and I went out to celebrate with dinner that night and returned to find the $3,500 chair I'd just purchased chewed into a thousand pieces by our dogs, Bones and Canyon. In that moment I wanted to scream, cry and vomit all at once but instead I told myself, "I won't let this defeat me" and I didn't. We realized we had accidentally locked our doggy door (both Bones...passed away last year...and Canyon are rescue dogs and HATE being locked indoors) so, in an attempt to get out and TELL US HOW ANGRY THEY WERE TO BE LOCKED INSIDE, they destroyed the chair. Today, when I popped back into Louis midday to see if the bathroom was finished I smelled something musty and awful. I looked towards the back and this is what I found....again, my fault. I haven't replaced the rear window yet, only put a plexiglass quick fix up, so what did I expect? The other corner, however, I have no idea why is leaking. So, instead of pushing Louis off a ledge into the Hudson, I will take apart the back roof when the sun comes out and get to the root of the problem. A leather chair is one thing, a Scotty is another. This, too, shall pass.
WHAT I DID: After relieving the total urge to scream and storm off, I weathered this storm and, just like when I started the project, I took it apart piece by piece to find the source. My twin mattress is soaked, so I've put that indoors with a fan and dehumidifier. I then removed the fabric wall I made and the foam behind it. Apparently the marker lights on the rear roof, streetside, are still leaking. So, when the rain stops I will figure that out. And, obviously, I need to replace the rear window where I removed the air conditioning. For a moment I forgot I was no longer in Southern California, so this is a chance I shouldn't have taken and one I'm paying for. BUT, I'm determined not to spend a penny to fix this.
WHAT I LEARNED: I've got to take the time to make sure things are water tight before moving on to the next project!!

Monday, June 20, 2011

Instant Gratification


This weekend found me getting down and dirty in Louis bathroom, a project I have put off since I bought him back in April. Why? Quite frankly, the tiny room scared me. It smells, I'm not sure how it works and I just didn't want to screw anything up. But, this weekend I decided to face that fear (especially after my maiden voyage when nature called at 3am and I was too tired to walk the 200 feet to the public restroom, a WORKING restroom can come in handy!) so I put on my work clothes and climbed underneath the trailer, determined to figure this thing out. Because I wasn't sure where to start, I took photos and posted them on the NSSO and SSCE sites for answers, which came in by the dozens. My main question was where does the "stuff" go, because I never saw a tank of any kind. While the commode is raised on a box, it is NOT a holding tank, so upon closer examination I realized that the tank was most likely removed at some point, or never there in the first place. There are lines from the water tank which fill the commode once the lever is pushed, but I believe a separate, portable tank is necessary. So, check that question off of my long list, and now it's time to head back inside and work on the pretty part, like getting rid of the moldy wallpaper and adding my own "flare." You'll have to check back tomorrow for the before and after shots of that because it was so muggy my paint wouldn't dry. But, here's a quick hint of what I've done...the floor (which also doubles as the shower floor with a drain in the middle) was rusty and pretty nasty. So, I grabbed a can of porch and floor paint in dark grey and used that (totally water proof, etc.) for a clean, dramatic look. While I waited for the paint to dry, I grabbed a cup of Joe and talked to my Joe...which reminds me of another little secret I discovered. I don't function in the morning until I've had at least two cups of coffee. On my maiden camping voyage my incredibly lovely mother-in-law, Peggy, made coffee by boiling water on her outdoor propane stove. This process took twenty minutes. By the time it was finished I was chewing bark off the trees around our campsite! Then I came home and discovered a lovely little secret at my local Starbucks...INSTANT COFFEE. Now, the thought of instant coffee often conjures up the image of watered down, tasteless coffee. This is far different from that! Dare I say, it's delicious, and I need not tell you what a coffee snob I am! Simply add hot water, stir and enjoy! Boxes of twelve of Starbucks VIA coffee start at $8.99, come in different flavors and ranges, and are available in stores and online at www.starbucks.com. Impatient like me? Wait not more, instant is just a few seconds away!

Friday, June 17, 2011

The Good Book


Ok, it's no secret that I've been remiss in posting any photos of work I've done on Louis because, quite honestly, it's been too damn hot or raining like the dickens, so I've been doing most of my work indoors. After my maiden voyage a few weeks ago, I took the opportunity to take notes on work I've done and make a list of all the things I've forgotten or haven't gotten to yet. One major thing on that list is addressing the bathroom/closet. I wish I loved the original wallpaper, but it makes me think of a sad basement or nursing home and it smells a bit of urine and moldy water. So, that will be first to go...but before I jump the gun and start redesigning the pretty parts, I have to figure out how the nuts and bolts of it work. A previous owner attached a clothes rod in the middle, which comes in quite handy, so I hung my clothes and stored outdoor chairs, etc. for travel. However, after a few Vodka Tonics campside, three AM came around quickly and when nature called I wanted nothing to do with walking out in nature, so just tested out the facilities in Louis. To my surprise, it wasn't the tragedy I thought it might be. Instead, it left me with several questions. So, I came home and quickly sent out a question to the SSCE and NSSO groups, to which I got amazing replies. So many, in fact, I was a bit overwhelmed. So, just like I'd advise someone attacking a home project to dial themselves down and look at each individual part, I decided to print up the original Scotty manual and all advice from both sites. This way, I have all the answers to my questions in one, cohesive place (you know how difficult it can be to sift through hundreds of emails looking for answers). After a few minutes, I've got an owners manual (with thanks to the great information posted on the SSCE site). I also added photos of other peoples redo's so I can take my binder with me out to the trailer, study it and get to work. The next photos I post here will hopefully be of that Scotty Potty getting a much needed makeover!
WHAT I DID: Hoped on over to Target and picked up a cool binder and protective plastic sheets so my papers don't get dirty or wet. Came home and jumped on the SSCE site, printed up the pages for the Hilander Manual along with emails of advice, and plopped them in the book. Sure, if you buy a Mercedes today they'll give you the owners manual on an ipad, but my version suits me just fine!

Wednesday, June 15, 2011

Follow this tip and you'll never slip!


I'm sure more seasoned campers already know little tricks like this, but I was happy to discover a great little idea for keeping things in place while driving all over the place. I've loaded the cabinets of Louis with vintage finds I've collected throughout the year and I'd rather not pack and repack 5,000 times, so to keep everything from flying around, I popped into the Dollar Tree store in our neighborhood and for $1.00 bought slip-free shelf liners. One roll covered my cabinets and utensil drawers. When I arrived at camp last weekend, 100 miles of windy, mountainous road later, I was pleased to find everything exactly the way I left it. In fact, this is the photo I took upon arriving...nothing is out of place, just the way I like it!

Tuesday, June 14, 2011

A Window into the future


As soon as the temperature drops low enough on the east coast to go outside, so do the raindrops...and lots of them, so I haven't been able to do a lot of the projects I've wanted to attack on Louis after his maiden voyage. Instead, I've made a list of all of the little projects that can make you completely insane, and have decided to start checking those off my long list while I wait for Mother Nature to cooperate. I started this project with a very tight budget and that, like the economy, hasn't changed so I'm trying to stick to it! I used to drop $300 on jeans without blinking an eye (which makes my left eye twitch now thinking about it) and, as much as I want an awing on Louis, I just can't justify spending $300 on one. So, I have decided to make my own...and think I can do it for less than $20, but you'll have to check back after the sun comes out for that project. In the meantime, as I said, it's the little projects that often get ignored (at least in my house) that have to be done. Take the screens on the windows, for example. And, Mr. Serro, who knew such a little trailer could have SO MANY?? When I bought Louis the screens were fine, yet aged and a bit "crumbly" for lack of a better term. Add my unseasoned swing of an axe to remove the back bunk, and well, you've suddenly got a tear in a screen window. Flash to an evening in the trailer, and I have a family of mosquito's feasting on my skin. Because we were in the process of screening in one of our back porches at home, I used those same materials for Louis (which happened to be the same size) but I noticed at both Home Depot and Lowe's a roll of screen and the rubber casings wouldn't cost more than $20. I did not, however, splurge on the $8 tool suggested for pushing the rubber into the slots around the window. I opted for my pizza cutter with a piece of painters tape wrapped around the blade to keep it from cutting my rubber.
HERE'S WHAT I DID: I laid my first window out on a large, flat surface and removed the old, dirty screen. I then cut a piece of new screen, a slightly darker tint to make the trailer a bit cooler inside, about six inches wider all around and secured it to the flat surface with strong tape, making sure it was tight over the window. I then slowly laid down the long, coiled rubber molding inside the grooves and pushed it in with my pizza cutter. While one window took me about a half hour, I'm sure I'll get faster as I go along. Hopefully, with a little care, these will last a long, long time!
WHAT THIS PROJECT COST ME: Not a penny

Tuesday, June 7, 2011

Made-In Voyage


I've been away from an Internet connection, so not able to blog, as I took Louis out for his maiden voyage to Mongaup Pond, New York, a campsite about 90 miles northwest of our home in Garrison, NY. I learned several things on this short trip away in my new vacation home on wheels, mainly I have a LOT of work to do. So, before I start on my next project (the bathroom) let me share a few things I learned this weekend:
1.) I have a Toyota Land Cruiser which gulps gas like nobody's business, so I filled her up ($95.00), hooked Louis up and went on our way. The day was crisp and clear but incredibly windy. While it's a fairly uphill drive from here, I found myself "punching the gas" on the hills, which duh, sucked the gas right out. So, I slowed down and enjoyed the journey. At the end of my 220 mile roundtrip journey (with a few rides into town for firewood, etc.) my gas guzzler averaged 12mpg, which isn't terrible. LESSON: Slow down!
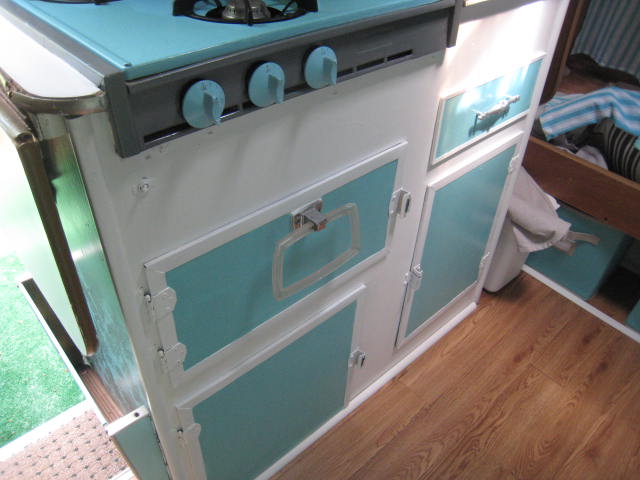
2.) Because I wanted my first experience to be perfect, I rushed several projects that ended up (literally) falling apart in transit: mainly the trim work around a new cabinet, etc. I discovered it was time to take my own advice, much like I give to clients when designing a home. Don't get overwhelmed by the projects entirety, but break down the pieces and attack them one by one. So, today I will take down my half-a##ed trim work and start over. LESSON: Taking time to do it right, is indeed the way to get it done properly the first time!
3.) One of my favorite things about this trailer is its size, small enough to light the entire thing up with one lantern and several battery operated candles. I didn't need electrical hookups, just my cool little battery operated lights and solar string for all the illumination I needed. LESSON: While I plan on updating the electric, I know how I use this trailer and don't need it right now! Want vs. NEED.
4.) Dryer sheets are a great way to keep the bugs away! AND to keep rodents out of the trailer when placed in drawers, etc. HOWEVER, the LESSON here was NOT to get the overly scented ones! My trailer ended up smelling like a cross between a whore house (not that I've been) and a used car salesroom.
5.) Getting on the ball; again, I learned to SLOW DOWN when I hooked up initially and couldn't figure out how to get the tongue all the way down on the hitch. It's okay to restart and do it again. LESSON again, SLOW DOWN.
6.) Make a camping list. How did I leave out chocks of all things??? Well, I got busy filling my new cooler and didn't make my check list, so I've devised a general "weekend camping" list on my computer which includes everything from toothpaste to an extra tarp just in case. LESSON: be prepared by making a list.
7.) And, finally, the overall lesson of this journey was to enjoy the moment. Mongaup Pond was such a beautiful, peaceful sight and the entire reason I got into camping as a kid. Getting away from the hustle and bustle of life and just enjoying it...not worrying about what the SSCE or NSSO will think of my half-finished project when they see it. Just enjoy the process and the point of it all.
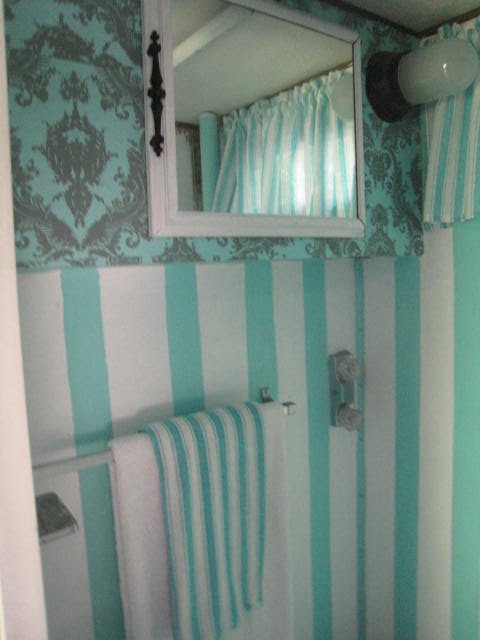
Tomorrow, the bathroom project begins!