


Finally the rain stopped, humidity stayed away for at least a day and I had enough time to drag a fan out to Louis and let the paint dry. So, here's what I've done to make this Scotty Potty a little more interesting. As I've said, this part of my redesign was the last on my list, because I just didn't think I would use this as a bathroom at all..UNTIL my maiden voyage. I don't like brushing my teeth in a public restroom (call me a snob) and having a late night place to release without walking through the dark woods was yet another added bonus. Plus, if and when I ever sell Louis, I'm sure the added feature of a wet bath will come in handy. After I figured the toilet situation out (where it leads to, how to clean and dump it, etc.) I felt much better. With my initial plan in mind (to spend as little as possible) I used paint I'd already had for other projects, adding my own little flare so now people won't mind going in there!
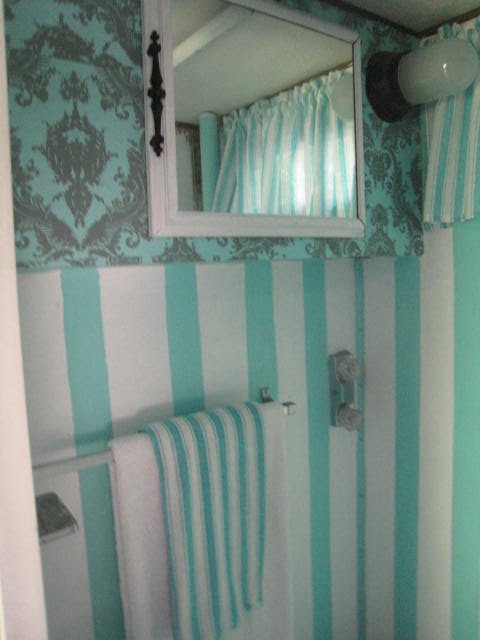
HERE'S WHAT I DID: The main interior of Louis is wallpapered with my great find from Amazon, cabinets are white and the dinette is painted turquoise/Aqua. I used three distinct colors/textures (wallpaper, white and Aqua) to make three distinct areas, giving the illusion of a bigger space. The Potty room marries all of these looks in one, funky, yet cohesive way. On the vanity I placed the same wallpaper as in the main areas. I removed the door, painted it white and updated the handle by painting it a mat black. Because removing the original wallpaper would be a pain in the neck and most likely result in more damage to the walls, I simply primed them with ZPrimer and added two coats of Semi Gloss bright white paint. For the floor I added a dark grey porch and floor paint. For that fun flare, I took the same aqua from the main area (mixed with both primer and paint at Ace Hardware) and painted stripes. Because I wanted these to trick the eye a bit (is it wallpaper or hand painted?) I did these freehand, without painters tape, no measuring distance between, etc. I love the somewhat artsy look of it (I drew lines on the wall with a pencil, made sure I didn't have too much coffee before I started to paint, and slowly followed the lines). For added protection on the floor (just in case it's ever used as a shower again) I added a coat of poly protectant. The only money I spent on this redo was $5.99 for the furry seat cover at Kmart (couldn't resist) and the valance curtain I pulled from a set I purchased at the Christmas Tree Store for $5.99 (set came with valance and two 36" curtains I will use in the main part of the trailer. Because we have 5,000 shower mats, I took one and cut it to size for the top of the toilet box. The interesting thing I noticed last night as we sipped martinis, you can actually create extra seating by having someone sit on the pot! Hummm
HOW LONG THIS TOOK AND HOW MUCH: Again, it was under $15 for my accessories and took two hours but almost a week to dry with the humidity and rain!
OMG Paul, that is the most AMAZING redo I have ever seen!!!! I wish you lived closer to help me with mine! :-( Okay, so I'll just get my inspiration and strength from you!
ReplyDeleteToilety awesome!!!!
ReplyDelete